Assignment 0 Due Wednesday Jan 31, 11:00am ET
Using AWS Academy, EC2, and Linux Shell
FAQs
- If you have trouble signing up AWS Academy due to the term item not showing up, it’s because of the browser compatibility issue. Try updating your Firefox and then try logging in using Firefox. (I will contact the AWS Academy support to see how this can be addressed as this is obviously a bug!)
- If you work with WSL, make sure to store your SSH key file under your Ubuntu home directory. Windows FS does not work well with
chmod 400. How to locate your/home/userdirectory is by typingcdand that will automatically bring you to your home dir. - Accessing the SSH key file stored under a cloud drive (OneDrive, Dropbox, or Google Drive) might have permission issue. If that happens, move
vockey.pemto a local directory not under any cloud-managed folder and that should fix the permission issue. - For Windows user, we recommend installing WSL (the Windows Subsystem for Linux). You can find the installation documentation here. With WSL, you can use the familiar Linux commands for SSH, file operations, and all other kinds of shell-related tasks.
- To copy your submission file from remote EC2 to local, you can use
scp(SSH copy). To do so:scp -i vockey.pem ubuntu@YOUR_ADDRESS:PATH_TO_YOUR_FILE .Note that calling scp from EC2 to copy file out will not work as your computer is behind NAT so it is almost not possible to be directly addressable. You need to run scp from your computer to copy file in from a remote EC2, which is addressable.
Overview
You will do all your assignments for DS5110/CS5501 using AWS Academy. Through AWS Academy, you can get access to a wide range of computing, storage, and network resources on Amazon Web Services (AWS). If you haven’t worked with AWS Academy before, you need to go through the AWS Academcy onboarding process.
This assignment will walk you through the AWS Academy registration process and show you how to use AWS and Linux EC2 from AWS Academy to setup an environment for upcoming programming assignments.
Learning outcomes
After completing this assignment, you should be able to:
- Create and SSH into an EC2 virtual machine (EC2) instance.
- Create a remote Jupyter Notebook server running on AWS EC2.
- Get familiar with basic Linux shell commands (browsing file system, installing packages, etc.).
Part 0: Register an AWS Academy account
You will receive a course invitation email sent to your virginia.edu email. You will need to register with AWS Academy Canvas (note this is different from UVA Canvas) before you can participate in the AWS Academy Learner Lab. To register, click on Get Started in the invitation email. It will bring you to the Welcome Aboard web page. Enter a password under your email, select Eastern Time (US & Canada) as the Time Zone, and click on Register.
After successfully registered, you will have access to your AWS Academy portal. You will see the AWS Academy Learner Lab under Dashboard. Click on Accept to accept the invitation to join AWS Academy Learner Lab if you see a message at the very top of the web page.
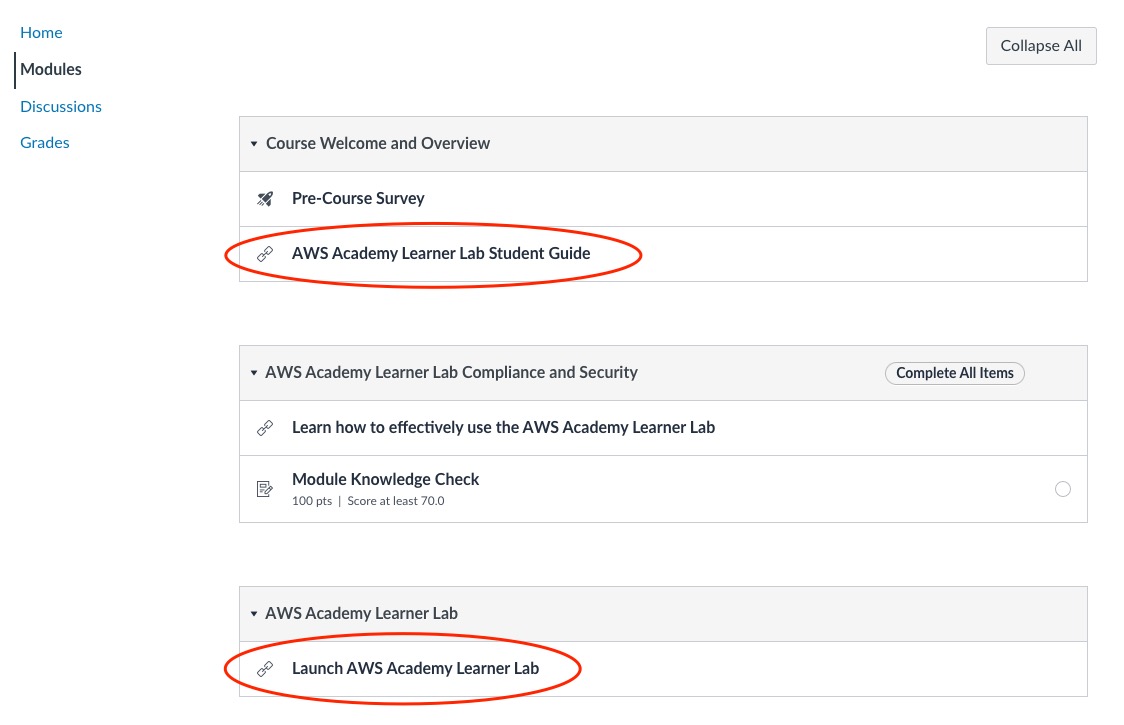
Click on AWS Academy Learner Lab at the Dashboard to enter. Then click on Modules to view the available modules. Before start using AWS resources, I highly encourage you to go through the AWS Academy Learner Lab Student Guide to get you familiar with how to use Learner Lab (including how to start a lab, how to track your credit, etc.).
To start using the AWS resources, click on Launch AWS Academy Learner Lab under Module, which will bring you to the Terms and Conditions. Click on I agree and enter the lab session.
The lab session is a web terminal interface with limited functionality. To start the lab, click on Start Lab at the top of the web terminal interface. The starting process should take a few minutes (if this is the very first time you start the lab, as in the background AWS Academy creates a temporary AWS account for you under the Learner Lab). At the same time, you can see your available AWS cloud credit with a total amount of $100 and how much you have used. When the signal light at the top left corner turns green, it indicates the lab has started.
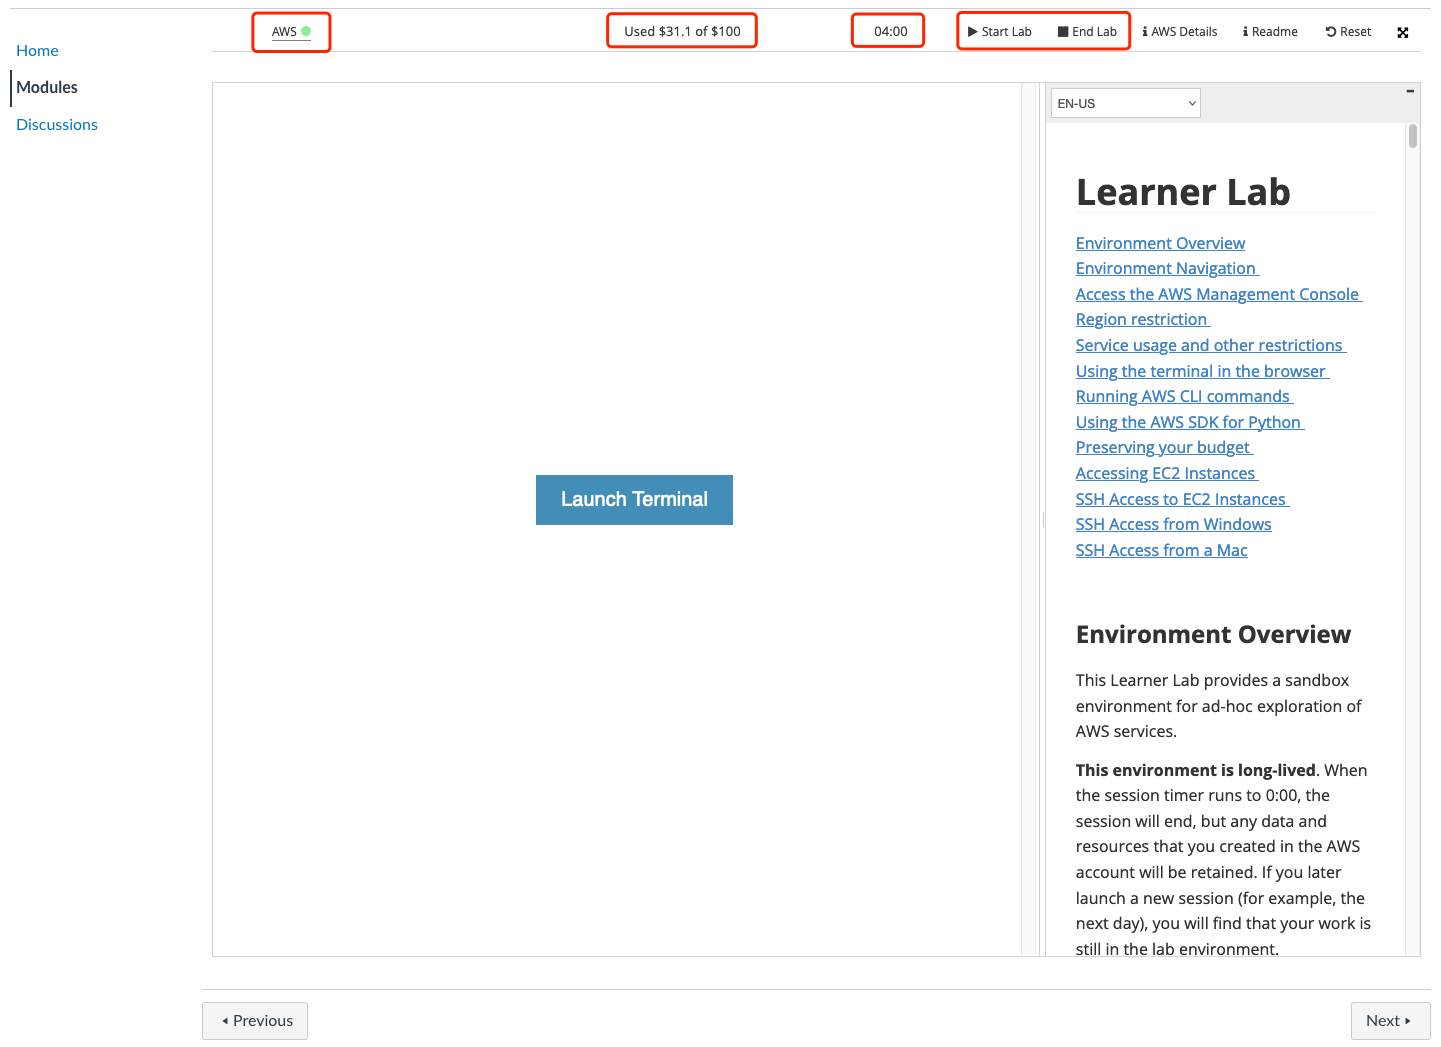
Click on the green signal light to access your AWS Console Home web page.
A started lab session has a session duration of up to four hours (see the timer 04:00 in the figure above). When the lab session timer runs to 0:00, the session will automatically end, but any data and resources that you created in the AWS account will be retained. If you later launch a new session (for example, the next day), you will find that your work is still in the lab environment. Running EC2 instances will be stopped and then automatically restarted the next time you start a session.
IMPORTANT: Monitor your lab budget in the lab interface above. Whenever you have an active lab session, the latest known remaining budget information will display at the top of this screen. This data comes from AWS Budgets which typically updates every 8 to 12 hours. Therefore the remaining budget that you see may not reflect your most recent account activity. If you exceed your lab budget your lab account will be disabled and all progress and resources will be lost. As a best practice, we highly recommend frequently pushing your progress to online repositories such as GitHub to avoid losing data. Therefore, it is important for you to manage your spending. When you use GitHub or any other online repository service, make sure to create a private repository; DO NOT share any of your code to other students and the internet.
At the AWS Console Home page, click on Services at the top left corner and click on Compute to view all the available computing services that you may use. Click on EC2 to start creating new EC2 VM (virtual machine) instances.
Part 1: Create and access EC2 instances
Step 1: Create a name and choose an OS image for your VM
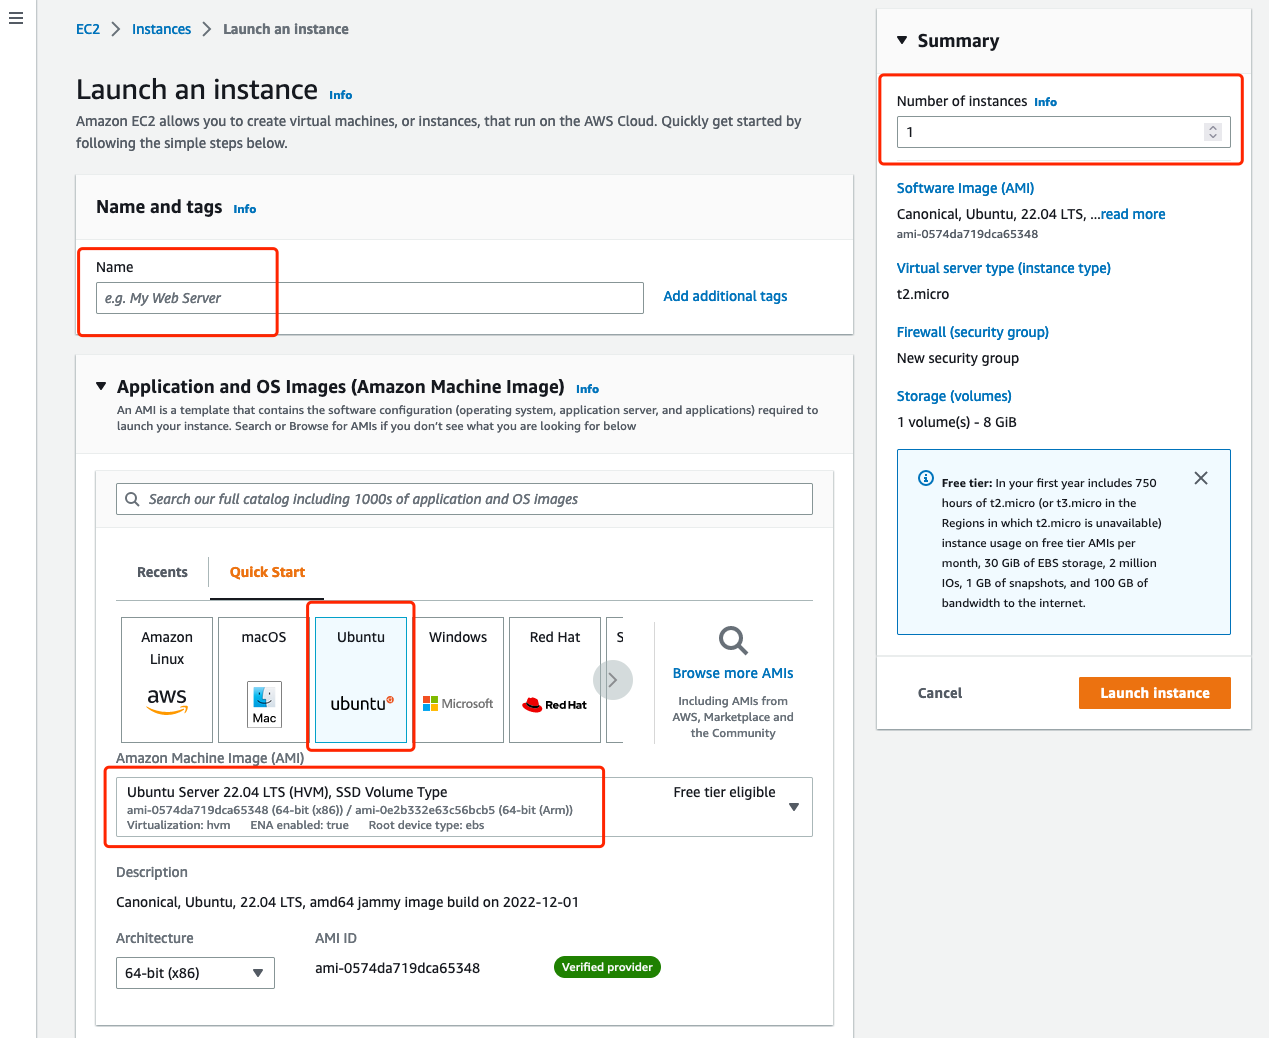
Under EC2, click on Launch instances to start creating a new VM. Type a name to label your VM under Name and tags. For example, name your first instance vm0.
We recommend using Ubuntu Server 22.04 LTS as the OS image and 64-bit (x86) as the architecture. You can also specify the number of instances to launch at this time. To start off, choose 1. Later for Assignment 1 choose 2 and for Assignment 2 choose 5.
Step 2: Choose an EC2 instance type
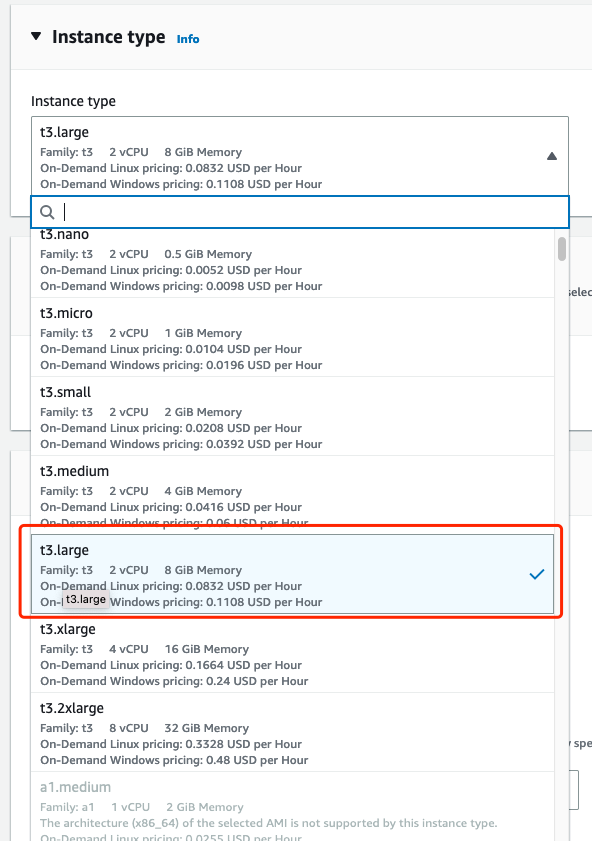
Next choose an EC2 instance type. To test, you can always create one or multiple t2.micro or t1.micro, both of which are free tier eligible, meaning the resource is free of charge. There are, however, a limited range of EC2 instances that you can choose from. We recommend using the t3.large instance type that comes with 2 vCPU cores and 8 GB of memory.
Step 3: Choose an SSH key pair
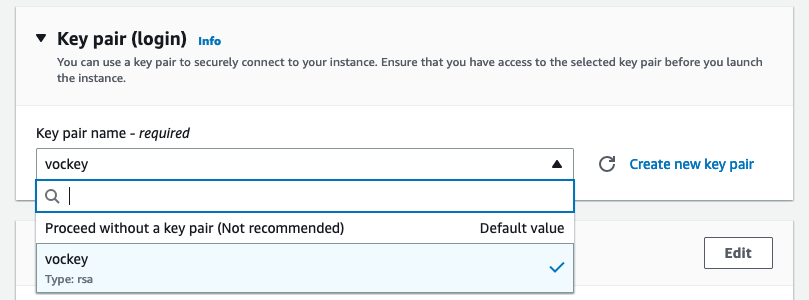
What is important when creating new VMs is that you choose a key pair for SSH login. Under Key pair (login), click on the drop down menu and select vockey (type rsa).
Step 4: Check HTTP/HTTPS options
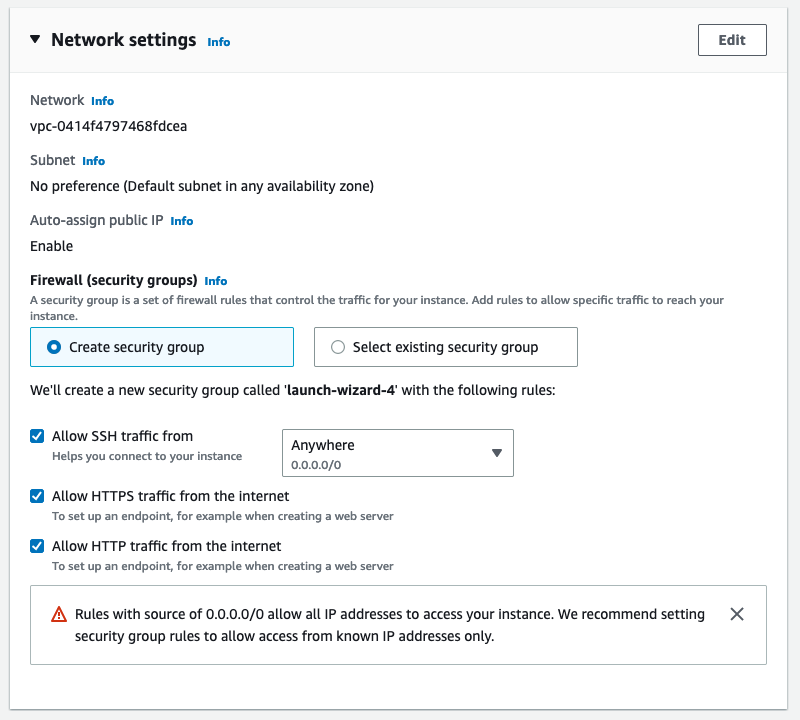
Under Network settings, you may check Allow HTTPs traffic from the internet and Allow HTTP traffic from the internet so that you can access the web servers hosted on your EC2 VM. (Apache Spark comes with a web-based dash, and would require HTTP/HTTPS traffic.)
Step 5: Configure storage
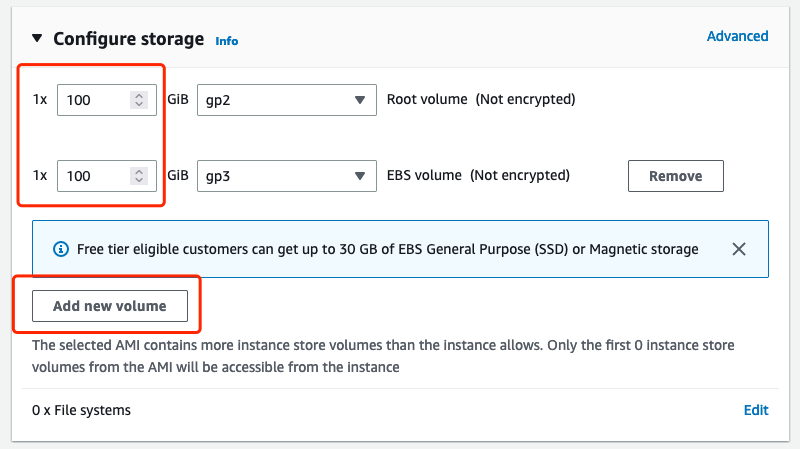
You may also increase the storage capacity of the Root volume under Configure storage. By default you will be allocated a small 8-GB root disk. We recommend increasing it to 100 GB so that you have sufficient disk storage capacity for dependency installation and storing datasets. Optionally, you can also add a new EBS volume of 100GB just in case the 100GB root volume runs out of capacity (it runs out of space very fast considering the installation of quite a few large software packages and datasets).
Step 6: Configure the subnet availability zone
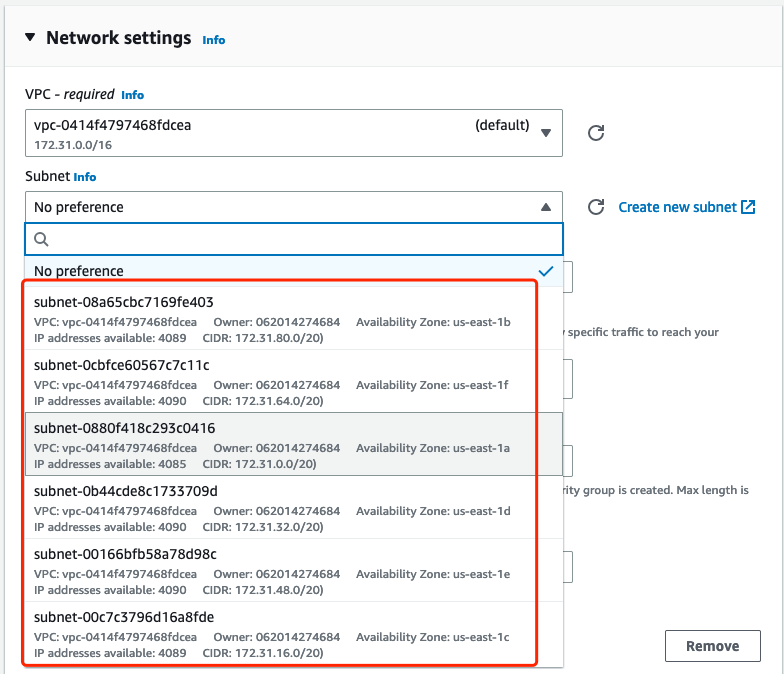
We recommend launching all your EC2 instances in the same availability zone. Any US east zones should be fine. This can be configured in Network settings. Once choosing one, always stick with it when creating new EC2 instances. This is to guarantee the best network performance among your EC2 instances. For example, you may choose to use a subnet within an availability zone of us-east-1a and stick with it.
Step 7: Launch the EC2 instance
After finalizing the EC2 VM configuration, click on the Launch instance button on the right side to launch the configured VM. It may take a few minutes to start the VM.
Step 8: Download the SSH private key
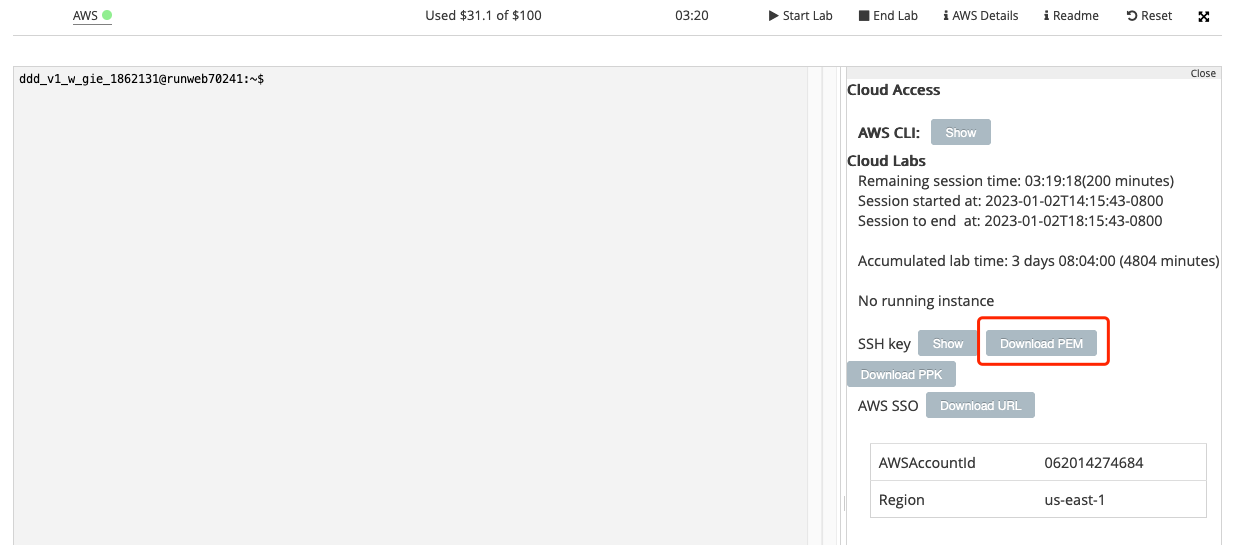
Now go back to the Learner Lab web page. This is where you can download the SSH key. Click on the AWS Details tab, you will see the information you need to login to your computing resources. Under SSH key, click on Download PEM to download the SSH key to your local computer. It comes with a default name of labsuser.pem.
Step 9: Login to the EC2 instance through SSH
Open a terminal (if you use a MacBook, open the Terminal software; if you use a Windows, we recommend installing WSL), locate your private key file that you have just downloaded locally, change its name to vockey.pem and update its permission, if necessary, to ensure your key is not publicly viewable:
% mv labsuser.pem vockey.pem
% chmod 400 vockey.pem
Then, connect to your instance using the following command:
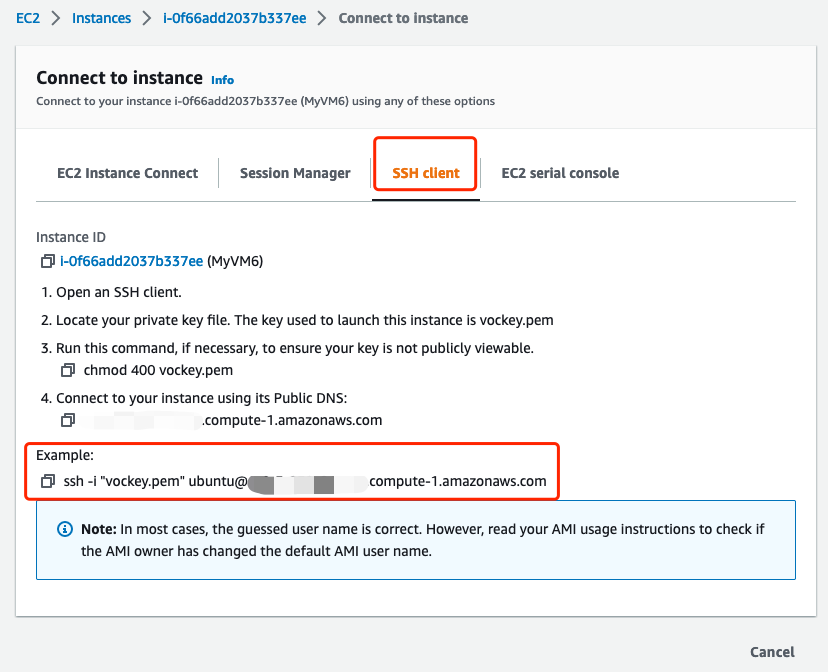
% ssh -i "vockey.pem" ubuntu@[public_IPv4_DNS_address_of_your_EC2_instance]
To view the connection instruction, click on the instance ID from your AWS Console, then click on Connect at the top right corner of the page to view the public DNS address of your EC2 instance. An example name looks something like this: ubuntu@ec2-11-222-3-190.compute-1.amazonaws.com, where ubuntu is your default username on any EC2 instances that you created.
Great! So far you should be able to SSH login to a remote Linux VM computer that you have just created on AWS running on somewhere in some North Virginia datacenter!
Part 2: Setting Up an AWS-EC2-hosted Jupyter Notebook Service
There are two ways of writing/editing PySpark programs on a remote cloud server:
- Use a shell text editor of your choice (e.g., VIM, nano, Emacs, etc.).
- Launch a Jupyter Notebook and directly write PySpark code there.
This tutorial is provided in case you need to use Jupyter Notebook for Assignment 1, though you can complete the assignment without it.
Step 0: Install Pip
First, install pip3 (the package installer for Python).
$ sudo apt update
$ sudo apt install -y python3-pip
$ which pip3
The third command above, which pip3, should output something like /usr/bin/pip3 if it’s successfully installed.
Step 1: Install Jupyter Notebook
To install Jupyter Notebook:
$ pip3 install notebook
pip3 by default will install everything in /home/ubuntu/.local/bin on your EC2 instance. This path, however, is not included by the environment variable $PATH, so your shell will not be able to locate the installed programs through pip3. To fix this, you will need to include the path in $PATH by running the following command:
$ source ~/.profile
$ which jupyter
Step 2: Deploy a Jupyter Notebook server
SSH into your EC2 instance where you’ve just installed the Jupyter Notebook (say the scheduler instance vm1) using the following command:
$ ssh -i "vockey.pem" ubuntu@<public_IPv4_DNS_address_of_your_EC2_instance> -L 8000:localhost:8888
The -L option is to forward any connections to the given TCP port 8000 on your local client host to the given remote host (the specified EC2 instance of <public_IPv4_DNS_address_of_your_EC2_instance>) and port (8888), or Unix socket, on the remote side.
Once SSH’ed in, start the Jupyter Notebook server process using command jupyter notebook. You will see some output information generated by the launched Notebook server process:
To access the notebook, open this file in a browser:
    file:///home/ubuntu/.local/share/jupyter/runtime/nbserver-3233-open.html
Or copy and paste one of these URLs:
    http://localhost:8888/?token=557f06135dd4c77bc5267c88abca55db1672f741ff7631a4
 or http://127.0.0.1:8888/?token=557f06135dd4c77bc5267c88abca55db1672f741ff7631a4
On your local client machine, open a web browser and go to localhost:8000 and copy paste the token when it prompts. Now you can start writing Python code using your Notebook GUI from your browser.
Step 3: Work on Python programming using your cloud-native Notebook
Create a new Notebook and select the default Python 3 (ipykernel) Notebook kernel. Than you are good to go.

Part 3: Shell Script
If you have successfully cleared all previous parts and steps, congratulations! Now you have a cloud VM with basic programming environment setup.
In this part, you will practice some basic shell command / shell script skill by completing the following tasks.
Task 1: Check Operating System version, hardware configuration, and your Jupyter Notebook install
Create some system and environment information using basic shell commands. You should use man the Linux manual command to print what a command does. For example, if you type man lscpu it will tell you what lscpu is. Save the outputs to submit:
$ cat /etc/os-release > os.txt
$ lscpu > cpu.txt
$ lsmem > mem.txt
Then, create some more files so we can check your install of pip3 and Jupyter Notebook:
$ pip3 --version > pip3.txt
$ jupyter --version > jupyter.txt
Task 2:
This zip file contains two CSV files with StackOverflow post data. You need to download the dataset to your EC2 VM instance:
pip3 install gdown
gdown https://drive.google.com/uc?id=1vlczaocHyghEW5Q-6WprqB2nnna_wrLE
In the above commands, the first command is to install the downloading tool gdown so that you can use it to download large files from Google Drive.
Try running some shell commands to extract the contents and print how many lines contain the text "python".
Now, combine these commands in a count_python.sh script file; the script should have a shebang line so that the following runs with bash:
$ ./count_python.sh
HINTS: You can use
unzipto extract the CSV files from the zip archive. Ifunzipis not installed by default, you should runsudo apt install -y unzipto install it on your EC2 instance.
Deliverables
You should submit a tar.gz file to Canvas, which follows the naming convention of LastName_FirstName_ComputingID_A0.tar.gz. The submitted file should contain the following: os.txt, cpu.txt, mem.txt, pip3.txt, jupyter.txt, count_python.sh.
HINTS: You can use the following command to create a
tar.gzfile:tar -czvf [submission_file_name] os.txt cpu.txt mem.txt pip3.txt jupyter.txt count_python.sh.
Autograder
You can use supplied autograding test suite to test your work and environment setup. There are two .py files you need to download: autograde.py (https://tddg.github.io/ds5110-cs5501-spring24/assets/datasets/autograde.py) and tester.py (https://tddg.github.io/ds5110-cs5501-spring24/assets/datasets/tester.py). Use wget to download these two files from the links above. Run python3 autograder.py to test your work. The test result will be written to a test.json file in your working directory. This will probably be your grade, but autograders are imperfect, so we reserve the right to deduct further points. Some cases are when students acheive the correct output by hardcoding, or not using an approach we specifically requested.