Assignment 1 Due Wednesday Feb 22, 11:00am ET
FAQs
- If you have trouble accessing the web dashboard of HDFS/Spark, try the following trouble-shootings:
- You should access the public_IPv4_DNS_address followed by colon and the port number instead of the public IPv4 address or private address.
- If that does not work, check if you configured the
spark-3.3.1-bin-hadoop3/conf/spark-env.shfile correctly. - If that still does not work, see if the HTTP/HTTPs permission are not checked when you created the EC2 instances. See Step 4 in A0.
- As a last resort, go ahead and create a new Security Group with
All trafficand0.0.0.0/0and attach it to BOTHvm1andvm2instance (configuringvm1only will lead to Spark job hangs and HDFS not being able to replicate) and remove the old Security Group fromvm1andvm2.
Please refer to the Notebook Setup Tutorial if you need/want to use Jupyter Notebook for this assignment.
If you want to use GitHub for saving your progress, refer to this post.
You will need to have HDFS and Spark up and running so your program can run on Spark and access
export.csvstored in HDFS.jpsis your friend – if you ever encounter errors or not being able to find an HDFS file, first check if you have your HDFS up and running. Likewise, if your code complains about not being able to connect to a Spark master, runjpsto check if you have launched Spark already. NOTE here HDFS and Spark are server cluster programs but not an embedded library/package that you import and use. You need to launch them first before using them.If you mistakenly reformatted your HDFS NameNode more than once, you might end up not being able to launch your NameNode or DataNode as they have inconsistent VERSIONs. FIX: Go ahead and stop your HDFS, remove whatever files under your
datanodeandnamenodefolder, reformat the Namenode, and start HDFS again. NOTE you should not reformat NameNode after it’s up and running.Always use HDFS dash and Spark dash to monitor things. For example, if you repeatedly write same file to HDFS, it refuses to overwrite it simply because HDFS does not support in-situ overwrites. In this case, you can check under HDFS utilities tab if the file exists on the associated path.
- Spark Job Hanging: If your PageRank code runs forever and won’t finish, the most likely culprit is that you have a previously sbmitted Spark job not stopped. Use Spark Dash to monitor any hanging job. If any, kill it or stop it using
spark.stop(). This would occur mostly likely when you use an interactive Notebook session: when you do interactive debugging, you forget to hit the cell that contains thespark.stop()statement; and that submitted job won’t be automatically removed and that blocks your next job.
Changelogs
- In Step 3, you need to copy
hadoop-3.3.4/etc/hadoop/hadoop-env.shtovm2as well. Please redo this step with thescpcommand if you haven’t.
Overview
This assignment is designed to support your in-class understanding of how big data analytics stacks work and get some hands-on experience in using them. You will need to deploy Apache Hadoop Distributed File System (HDFS) as the underlying file system and Apache Spark as the execution engine. You will then develop several small applications based on them. You will produce a short report detailing your observations and takeaways.
Learning outcomes
The objectives of this assignment are to:
- Configure and deploy Apache HDFS and Apache Spark using remote SSH and Linux terminal.
- Write simple Spark applications and launch them in a cluster.
- Describe how Apache HDFS and Apache Spark work, and interact with each other.
Part 0: Environment setup
You will complete this assignment in AWS Academy. You can refer to Assignment 0 to learn how to acess AWS through AWS Academy.
In this assignment, you should create two EC2 VM instances of type t3.large. (Go ahead and create two EC2 instances of the same type and then rename them: hover over the instance name and click on the edit button to change name; with a meaningful name like vm1 and vm2 you can easily know which instance you are logging into.) You will then deploy a two-node HDFS cluster and a two-node Spark cluster on these two EC2 instances.
Both Hadoop HDFS and Spark use Java. So, as the first step, you should run the following commands on every EC2 instance to install Java. Ubuntu 22.04 LTS comes with python3 (Python 3.10.6) installed. So you don’t need to manually install python yourself.
$ sudo apt update
$ sudo apt install -y openjdk-8-jdk
Then, you should enable password-free SSH service between the two EC2 instances. To do so, you need to generate a private/public key pair using:
$ ssh-keygen -t rsa
on the leader EC2 instance node (which we call vm1). The other EC2 instance will be assigned as follower. Then, manually copy the public key of vm1 to the authorized_key file in both of the two instances (vm1 and vm2) under ~/.ssh/. To get the content of the public key saved in id_rsa.pub, do:
$ cat ~/.ssh/id_rsa.pub
Then copy the entire output of the above command to authorized_key. Make sure you do not append any newlines. Otherwise it will not work. Also note that you should NOT overwrite the existing line in authorized_key file. Otherwise you will no longer be able to login to your VM.
Once you are done with vm1, you should copy the content of id_rsa.pub in vm1 over to ~/.ssh/authorized_key in vm2. This way, the leader node vm1 will have password-free SSH access to both itself and its follower node vm2.
IMPORTANT: This is a critical step: if you do not complete this step, the startup script will not be able to remote start the HDFS/Spark daemon process on
vm2(you will get permission denied error).
Part 1: Software deployment
Hadoop Distributed File System (HDFS)
Apache Hadoop is a collection of open-source software utilities that provide simple MapReduce parallel programming models for batch processing of large datasets. It mainly consists of the Hadoop Distributed File System (HDFS), Hadoop MapReduce, and Hadoop YARN. In this assignment, we will only use HDFS. HDFS consists of a NameNode process running on the leader instance and a set of DataNode processes running on follower instances. The NameNode records file-system-level metadata and handles file data retrieval and storage requests. The DataNode processes store actual data.
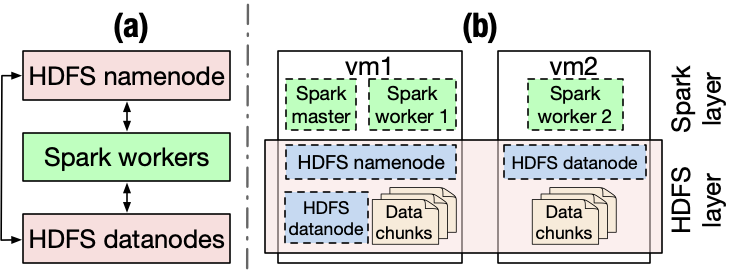
Figure(a) above depicts a logical architecture of how Spark interacts with HDFS.
You can find the detailed deployment instructions in this link or you can follow our simplified version:
Step 1: Download the software
Let’s first download Hadoop on each of the two EC2 VM instances. Note that you can do this on vm1 and then scp (ssh-copy) to copy the downloaded software tar ball to vm2.
$ cd ~
$ wget https://dlcdn.apache.org/hadoop/common/hadoop-3.3.4/hadoop-3.3.4.tar.gz
$ tar zvxf hadoop-3.3.4.tar.gz
$ cd hadoop-3.3.4
Step 2: Modify configuration files
There are a few configuration files that we need to edit. For HDFS, you can make edits on vm1 and then copy the files to vm2. These configuration files are originally empty (with comments) so users need to manually set them. Add the following content to replace the empty <configuration> ... </configuration> field in hadoop-3.3.4/etc/hadoop/core-site.xml:
<configuration>
<property>
<name>fs.default.name</name>
<value>hdfs://namenode_IP:9000</value>
</property>
</configuration>
where namenode_IP refers to the private IP address of the EC2 instance.
NOTE: You can use either the private IPv4 IP address or the public IPv4 DNS address. We recommend using the private IPv4 IP address as that will allow the data to go through private subnet. The
namenode_IPcan be found from the AWS Console: at AWS Console, click the corresponding EC2 instance, and copy the private IPv4 address from the instance summary.
Next, edit the file system directories in hadoop-3.3.4/etc/hadoop/hdfs-site.xml. Make sure you create the folders and specify the correct paths. For example, create hadoop-3.3.4/data/namenode/ and hadoop-3.3.4/data/datanode and set each to be the path for the value of the dfs.namenode.name.dir field and dfs.datanode.data.dir field, respectively (see the template hdfs-site.xml configuration file listed below). The third configuration property indicates the size of the HDFS block, which in the example is set to 64MB. (By default HDFS is configured with a block size of 128MB.) These directories indicate where data for the NameNode and DataNode will be stored respectively. Note that the path in the xml file should be absolute; also note that the same path needs to be manually created by yourself on both the leader instance vm1 and the follower instance vm2, because HDFS will run a DataNode process on each machine of the cluster.
<configuration>
<property>
<name>dfs.namenode.name.dir</name>
<value>/path/to/namenode/dir/</value>
</property>
<property>
<name>dfs.datanode.data.dir</name>
<value>/path/to/datanode/dir</value>
</property>
<property>
<name>dfs.block.size</name>
<value>67108864</value>
<description>Block size</description>
</property>
</configuration>
You also need to manually specify JAVA_HOME in hadoop-3.3.4/etc/hadoop/hadoop-env.sh so that HDFS can be launched. You can get the path with the following command:
$ update-alternatives --display java
Take the value of the current link and remove the trailing /bin/java. For example, a possible link can be /usr/lib/jvm/java-8-openjdk-amd64/jre. Then, uncomment line 54 in hadoop-3.3.4/etc/hadoop/hadoop-env.sh and set the JAVA_HOME by replacing export JAVA_HOME= with export JAVA_HOME=/usr/lib/jvm/java-8-openjdk-amd64/jre.
You also need to edit hadoop-3.3.4/etc/hadoop/workers to add the IP address of all the datanodes. Once again use the private IPv4 address. In our case for this assignment, you need to add two lines, each containing the IPv4 address of an EC2 instance corresponding to a datanode process. This way, the deployed HDFS can store data on both vm1 and vm2. (Delete the existing localhost line in this file.)
Step 3: Copy modified config files to the other EC2 instance
Then, copy the config files with these changes to vm2 as well. For example:
$ scp hadoop-3.3.4/etc/hadoop/core-site.xml hadoop-3.3.4/etc/hadoop/hdfs-site.xml hadoop-3.3.4/etc/hadoop/workers hadoop-3.3.4/etc/hadoop/hadoop-env.sh ubuntu@<IP_of_vm2>:~/hadoop-3.3.4/etc/hadoop/
Where ubuntu is the user name on vm2 and <IP_of_vm2> is the IP address of vm2.
Step 4: Add Hadoop binary paths to $PATH and start the HDFS
Now, from within vm1, add the absolute paths to hadoop-3.3.4/bin and hadoop-3.3.4/sbin to $PATH. To do so, echo the export line to the end of ~/.bashrc file and source it to make the changes effective:
$ echo 'export PATH="/home/ubuntu/hadoop-3.3.4/bin:/home/ubuntu/hadoop-3.3.4/sbin:$PATH"' >> ~/.bashrc
$ source ~/.bashrc
After this operation, you should be able to directly address all the binary executables of Hadoop that you have just installed.
Next, format the NameNode and start the NameNode and DataNode daemon processes on your cluster:
$ hdfs namenode -format
$ start-dfs.sh
This will format the HDFS data paths that you have just configured in Step 2 and start all the deamons.
To check the HDSF status over the HDFS dashboard, go to the following URL on your browser:
<public_IPv4_DNS_address_of_vm1>:9870/dfshealth.html
Where public_IPv4_DNS_address can be found in your AWS Console.
You can also use command jps to check whether HDFS is up and running. There should be a NameNode process that is running on vm1, and a DataNode process running on each of your two EC2 instnaces.
Now that your distributed HDFS cluster is all set, type the following to see the available commands that you can use to manage HDFS.
$ hdfs dfs -help
To stop the HDFS cluster, type:
$ stop-dfs.sh
Apache Spark
Apache Spark is a powerful open-source analytics engine for big data processing. Spark is built on its core idea of Resilient Distributed Datasets (RDDs). Spark standalone consists of a set of daemons: a Master daemon, and a set of Worker daemons. Spark applications are coordinated by a SparkContext object, which will connect to the Master, which is responsible for allocating resources across applications. Once connected, Spark acquires Executors on every Worker node in the cluster, which are processes that run computations and store data for your applications. Finally, the application’s tasks are handed to Executors for execution. We will use Spark in standalone mode, which means that it does not need to rely on resource management systems like YARN.
Figure(b) above depicts a physical architecture of the HDFS and Spark deployment.
Instructions on deploying a Spark cluster can be found in Spark’s official document. Or you can follow our minimalist instructions as follows.
Step 1: Download the software
First, download and decompress the Spark tar ball on each EC2 instance in the cluster:
$ wget https://archive.apache.org/dist/spark/spark-3.3.1/spark-3.3.1-bin-hadoop3.tgz
$ tar zvxf spark-3.3.1-bin-hadoop3.tgz
Step 2: Modify configuration files
The downloaded Spark 3.3 provide template configuration files with a common suffix of .template in spark-3.3.1-bin-hadoop3/conf/spark-env.sh; just remove the suffix and make direct edits in them.
Spark 3.3 requires Python 3.7 or higher. AWS’ Ubuntu 22.04 LTS comes with python3 (Python 3.10.6), and therefore, this dependency is already satisfied. Add the following lines to spark-3.3.1-bin-hadoop3/conf/spark-env.sh on both vm1 and vm2:
export PYSPARK_PYTHON=/usr/bin/python3
export PYSPARK_DRIVER_PYTHON=/usr/bin/python3
Similar to HDFS, on vm1 you will need to modify spark-3.3.1-bin-hadoop3/conf/workers to include the private IP addresses of all the worker machines (including both vm1 and vm2).
Next, bind Spark to the private IP address by setting the SPARK_LOCAL_IP and SPARK_MASTER_HOST in spark-3.3.1-bin-hadoop3/conf/spark-env.sh. According to the comments in spark-env.sh, SPARK_LOCAL_IP will be set with the IP address Spark binds to on this node, and SPARK_MASTER_HOST will be set with the IP address of the master instance. You only need to do this on vm1. To do so, add the following lines to spark-3.3.1-bin-hadoop3/conf/spark-env.sh:
export SPARK_LOCAL_IP=<private_IPv4_address_of_vm1>
export SPARK_MASTER_HOST=<private_IPv4_address_of_vm1>
Step 3: Start the Spark cluster
To start the Spark standalone cluster, run the following command on vm1:
$ spark-3.3.1-bin-hadoop3/sbin/start-all.sh
Go to <public_IPv4_DNS_address_of_vm1>:8080 (Spark web dashboard) on your browser to check the status of the Spark cluster.
To check if the cluster is up and running, you can use jps to check that a Master process is running on vm1 and a Worker process is running on each of your EC2 instances.
To stop the Spark cluster, run:
$ spark-3.3.1-bin-hadoop3/sbin/stop-all.sh
Next, setup the properties for the memory and CPU used by Spark applications. Set Spark driver memory to 4GB and executor memory to 4GB. Note that the t3.large EC2 instance has only 8GB of memory and 2 vCPU cores. Set executor cores to be 2 and number of cpus per task to be 1. Document about setting properties is here. One example configuration in spark-3.3.1-bin-hadoop3/conf/spark-defaults.conf is shown as follows:
spark.master                   spark://<private_IPv4_address_of_vm1>:7077
spark.driver.memory            4g
spark.executor.memory          4g
spark.executor.cores           2
spark.task.cpus                1
Part 2: A simple Spark application
In this part, you will implement a simple Spark application. We have provided some sample data collected at this link. Download the file to your home directory of vm1.
You then need to sort the data firstly by the country code alphabetically (the third column ccr2) then by the timestamp (the last column). Here is an example:
Input:
... cca2 ...  device_id ... timestamp
... US   ...  1         ... 1
... IN   ...  2         ... 2
... US   ...  3         ... 2
... CN   ...  4         ... 4
... US   ...  5         ... 3
... IN   ...  6         ... 1
Output:
...	cca2 ...  device_id ... timestamp
...	CN   ...  4         ...	4
...	IN   ...  6         ...	1
...	IN   ...  2         ...	2
...	US   ...  1         ...	1
...	US   ...  3         ...	2
...	US   ...  5         ...	3
You should first load the data into HDFS by the following command:
$ hdfs dfs -copyFromLocal export.csv /
Then, write a PySpark program in Python to sort the data. Examples of self-contained applications in Python are given here.
We suggest you also go through the Spark SQL Guide and the APIs. Spark DataFrame is a distributed collection of data organized into named columns. It is conceptually equal to a table in a relational database. In our case you will create DataFrames from the data that you load into HDFS. Users may also ask Spark to persist a DataFrame in memory, allowing it to be reused efficiently in subsequent actions (not necessary to do for this part of the assignment, but will need to do it in part 3).
An example of a couple commands if you are using PySpark (Python API that supports Spark) that should be handy.
from pyspark.sql import SparkSession

# The entry point into all functionality in Spark is the SparkSession class.
spark = (SparkSession
	.builder
	.appName("my awesome Spark SQL program")
	.config("some.config.option", "some-value")
	.master(master_URL:Port)
	.getOrCreate())

# You can read the data from a file into DataFrames
df = spark.read.json("/path/to/a/json/file")
Where the /path/to/a/json/file in our case should be an HDFS path of the export.csv file that you have just copied to HDFS. An example HDFS path looks like the following: hdfs://<the_IP_address_of_vm1>:9000/export.csv.
After loading data you can apply DataFrame operations on it.
df.select("name").show()
df.filter(df['age'] > 21).show()
In order to run your Spark application you need to submit it using spark-submit script from Spark’s bin directory. More details on submitting applications could be found here.
Finally, your application should output the results into HDFS in form of csv. It should take in two arguments, the first a path to the input file and the second the path to the output file. Note that if two data tuples have the same country code and timestamp, the order of them does not matter. See an example spark-submit command as follows:
$ bin/spark-submit /path/to/your_pyspark_app_part2.py <path_to_input_file> <path_to_output_file>
NOTE: To view the status of your running application, click on the
Application IDfrom your Spark IU webpage. It will bring you to the application status page. From there, click onApplication Detail UIto view the details including application progress, DAG visualization, breakdown of the execution statistics, etc. A caveat with EC2 is that you will see aWe can’t connect to the server at ...error after you click onApplication Detail UI. To fix this, you will need to manually replace the private IPv4 address with the public IPv4 DNS address of the master EC2 instance (vm1) in order to view the application detail. Make sure to only modify the IP address and leave the:4040intact.
Part 3: PageRank
In this part, you will implement the PageRank algorithm (§2.1) (or the Wikipedia version), which is an algorithm used by search engines like Google to evaluate the quality of links to a webpage. The algorithm can be summarized as follows:
- Set initial rank of each page to be 1.
- On each iteration, each page p contributes to its outgoing neighbors a value of rank(p)/(# of outgoing neighbors of p).
- Update each page’s rank to be 0.15 + 0.85 * (sum of contributions).
- Go to next iteration.
In this assignment, we will run the algorithm on the. Berkeley-Stanford web graph dataset. Each line in the dataset consists of a page and one of its neighbors. You need to decompress the downloaded .gz dataset (using gunzip) and copy the input file to HDFS first. In this part, always run the algorithm for a total of 10 iterations.
- Task 1. Write a PySpark application that implements the PageRank algorithm.
- Task 2. In order to achieve high parallelism, Spark will split the data into smaller chunks called partitions, which are distributed across different nodes in the cluster. Partitions can be changed in several ways. For example, any shuffle operation on an RDD (e.g.,
join()) will result in a change in partitions (customizable via user’s configuration). In addition, one can also decide how to partition data when creating/configuring RDDs (hint: e.g., you can use the functionpartitionBy()). For this task, add appropriate custom RDD partitioning and see what changes. - Task 3. Kill a Worker process and see the changes. You should trigger the failure to a selected worker VM when the application reaches anywhere between 25% to 75% of its lifetime (hint: use the
Application Detail UIto track the application progress):- Clear the memory cache using
sudo sh -c "sync; echo 3 > /proc/sys/vm/drop_caches"onvm2; - Kill the Worker process on
vm2: Usejpsto get the process ID (PID) of the Spark Worker onvm2and then use the commandkill -9 <Worker_PID>to kill the Spark Worker process.
- Clear the memory cache using
Deliverables
You should submit a tar.gz file to Canvas, which follows the naming convention of LastName_FirstName_ComputingID_A1.tar.gz. The submitted file should include:
- a brief report (filename:
LastName_FirstName_ComputingID.pdf), - the code of each task,
- a
READMEfile for each task.
Put the code of each part (Part 2 and 3) and each task (Task 1-3 in Part 3) into separate folders and givn them meaningful names. Code should be commented well (which will be worth some percentage of your grade for the assignment, the GTA will be looking at your code). In addition, put a README file for each task and provide instructions about how to run your code.
NOTE: Even if you write your code using Jupyter Notebook, please do not submit the
.ipynbNotebook file. Instead, you should submit the.pysource file; to do so, copy each cell of your.ipynbinto a.pyfile and ensure that it runs with thespark-submitcommand.
For the report, you should report the application completion time with respect to Task 1-3. Present or reason about the differences in performance or your own findings, if any. Take a look at the DAG lineage graphs of applications, Executor statistics (e.g., shuffle read, shuffle write), and the number of tasks for every execution from the Application Detail UI; these information may help you better understand the performance issues.
Acknowledgments
This assignment uses insights from Professor Shivaram Venkataraman’s assignment 1 of CS 744 Fall 2019.