Assignment 3 Due Wednesday Mar 20, 11:00am ET
A Deeper Dive with Ray
FAQs
- PLEASE DO NOT PROCRASTINATE!!
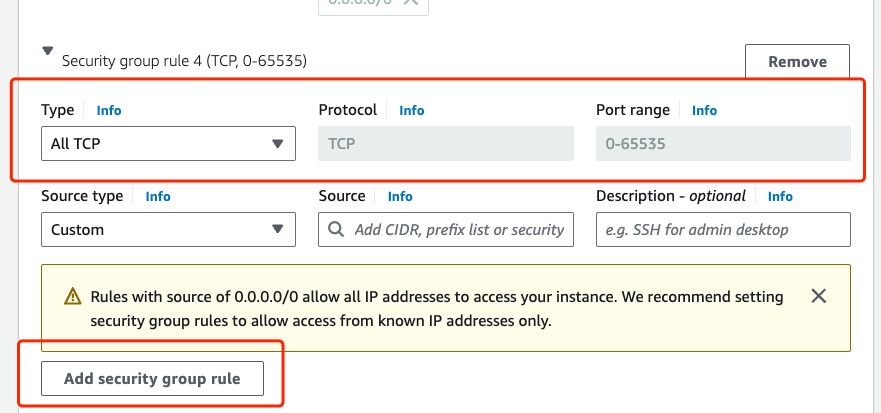
- For A3, if your decide to create new VMs, you need to follow the same practice as you did for A1 and explicitly add a new security group by allowing all TCP traffic. This is to ensure that your Ray workers are able to communicate across the network using TCP.
Changelogs
- MapReduce Task 2 updated: Each word should be in lowercase.
- MapReduce data partitioning template code updated: fixed a bug about the boundary bucket. IMPORTANT: You should use the updated template
ipynbfile for coding. The older version will yield a slightly different test outcome that may fail the test. - MapReduce Part 2 dataset updated: The Project Gutenberg dataset is updated quietly in the background, which might lead to inconsistent test outcomes if you download it at different times. If you have previously downloaded
a3_part2.zip, please download it again and discard the previous downloaded data.
Overview
This assignment is designed to support your in-class understanding of how Ray tasks and actors work and get some hands-on experience in programming them. You will need to deploy a five-node Ray cluster as the distributed execution engine. You will then develop two applications using Ray, a WordCount MapReduce program, and an actor-based reinforcement learning (RL) training framework that trains a DQN (Deep Q-Network) model capable of playing Lunar Lander. You will also produce a short report detailing your observations, takeaways, and experience.
This will be a fun assignment! 😎
Learning outcomes
The learning outcomes of this assignment are to:
- Configure and deploy Ray using SSH and Linux shell.
- Describe how Ray tasks and actors work.
- Write simple distributed Ray applications using Ray tasks and actors and run them in a cluster.
Part 0: Environment setup
Like the previous assignments you will complete this assignment on AWS. Hopefully by now you have got yourself familiar with setting things up in AWS via Academy. See Assignment 0 about how to use AWS Academy to access AWS cloud resources. See Assignment 1 about how to change network settings to enable ALL TCP traffic.
In this assignment, you should create a total of five EC2 VM instances of type t3.large or m5.large. (Create five EC2 instances of the same type in a batch and then rename them: hover over the instance name and click on the edit button to change name; with a meaningful name like vm1 to vm5 you can easily know which instance you are logging into for your Ray cluster) You will then deploy a five-node Ray cluster. To batch create multiple EC2 instances, follow the instructions from Assignment 0 (Step 1).
However, it is fine to reuse your existing EC2 instances. If this is the case, you need to add new instances to construct a five-node cluster.
Important step: Change network settings by adding a new ALL TCP security group
IMPORTANT: You need to configure the Network settings of all EC2 instances. Like previous assignments, for A3, you need to explicitly add a new security group by allowing all TCP traffic. This is to ensure that your Dask workers are able to communicate with your Dask scheduler using TCP.
If this is a new EC2 instance, always run apt update before installing any dependencies.
$ sudo apt update
$ sudo apt install -y python3-pip
In A3, you do not need to setup the SSH password-free step.
Part 1: Software deployment
Ray parallel computing framework
Ray is an open-source unified framework for scaling AI and Python applications like machine learning. It provides the compute layer for parallel processing so that you don’t need to be a distributed systems expert. In this assignment, you will learn how to program Ray to implement distributed data processing and ML applications.
Step 1: Install the software
First, install the ray[default] (Ray Core) module for general Python applications on each of the five EC2 VM instances.
$ pip3 install "ray[default]"
$ source ~/.profile
Verify if Ray is installed sucessfully on your VM instances via the following command.
$ ray --version
This command should output the following information: ray, version 2.9.3.
Step 2: Start your Ray cluster
Your Ray cluster consists of a head node and multiple worker nodes. Each {head or worker} node has three layers: a computing layer, a storage layer, and a scheduler layer.
Now that you have installed the Ray software in Step 1. In this step, you will start a Ray cluster.
On your head node vm1:
$ ray start --head --port=6379
The start command provides detailed instructions for the next steps of Ray cluster setup. Simply follow that to launch your Ray workers on the other four EC2 instances.
OR, you can follow my instructions to start the Ray worker processes on your worker nodes {vm2, vm3, vm4, vm5} via the following command:
$ ray start --address='<private_IPv4_addr_vm1>:6379'
Check the current status of your Ray cluster using:
$ ray status
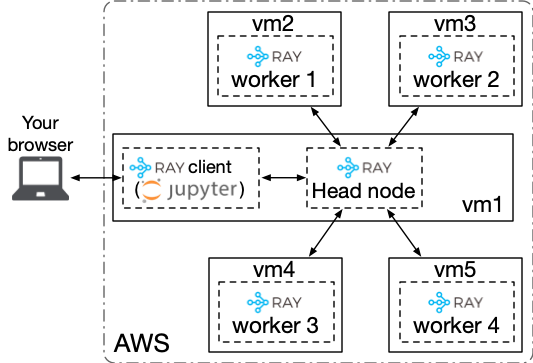
Great! You have a five-node Ray cluster up and running. The figure below depicts a birds-eye view of your Ray cluster’s architecture. You still need SSH port forwarding (-L 8000:localhost:8888) in order to access the remote Jupyter Notebook server that you run on vm1.
Like Dask and Spark, Ray also provides a handy dashboard UI. To access the Ray dashboard, you need to specify port forwarding when you SSH into vm1. To do so:
$ ssh -i "vockey.pem" ubuntu@<public_IPv4_DNS_address_of_vm1> -L 8265:localhost:8265
Enter localhost:8265 or 127.0.0.1:8265 on your browser to access the Ray dashboard. Attached below is a snapshot of how the Ray dashboard looks like.

Part 2: MapReduce on Ray
In this part, you will exercise Ray remote task programming. Specifically, you will implement a simple MapReduce application (WordCount) on your Ray cluster. We have provided three files and a directory. Download the zipf file at this link using wget. The zip file includes:
adownload_gutenberg.shbash script to download the text files as the input;
NOTE: Project Gutenberg is updating the text of its eBooks, causing inconsistent test results; therefore, we will use a snapshot of the text datasets from 98 eBooks downloaded in Feburary 2024 for testing.
a
mr_txtdirectory containing all the Project Gutenberg text files;a
ray_mr_skeleton.ipynbMapReduce skeleton file to help you get started;a
test_mr.shbash script for testing and autograding;and a
mr_correct_wc.txtfile that will be used bytest_mr.shfor autograding.
The only file that you need to modify is ray_mr_skeleton.ipynb. Please do not modify download_gutenberg.sh, test_mr.sh, and mr_correct_wc.txt.
To start off, run download_gutenberg.sh to dowload a total of 98 text files into a new directory called ./mr_txt (this script will automatically create this directory for you):
All the text files are contained in the mr_txt directory. These text files will be the input of your WordCount application.
IMPORTANT: If you previously downloaded the Project Gutenberg files, you should just remove the downloaded files and instead use the text files supplied in the
mr_txtdirectory decompressed froma3_part2.zip.
Implement the WordCount MapReduce job in the provided skeleton Notebook file (you should change the Notebook file name for submission).
To initialize a Ray client, run the following Python code:
ray.init(address="ray://<private_IPv4_addr_vm1>:10001")
Once your Notebook session successfully connects to Ray cluster’s head node, you should execute the following cell to check if your Ray cluster has the required number of worker nodes:
print('''This cluster consists of
    {} nodes with
    {} CPUs,
    {} GiB of aggregate memory capacity, and
    an object store of {} GiB of memory.
    '''.format(len(ray.nodes()), ray.cluster_resources()['CPU'],
           ray.cluster_resources()['memory'] / (1024*1024*1024),
           ray.cluster_resources()['object_store_memory'] / (1024*1024*1024)))
Your job
Your job is to implement a distributed MapReduce WordCount application, consisting of two programs, a mapper and a reducer. There is a client driver, and multiple Ray worker processes on multiple EC2 instances, executing map and reduce tasks in parallel.
The client will first prepare the input datasets by reading all word text into a corpus list and partition it into M buckets (i.e., partitions, equivalent to the concept of HDFS file blocks), where M is the number of map tasks. The client will then dispatch the input buckets to the map tasks running on your Ray workers. Note that the number of map tasks could be larger than that of available Ray workers deployed in your cluster. M do_map_task will be invoked in parallel to execute the map tasks.
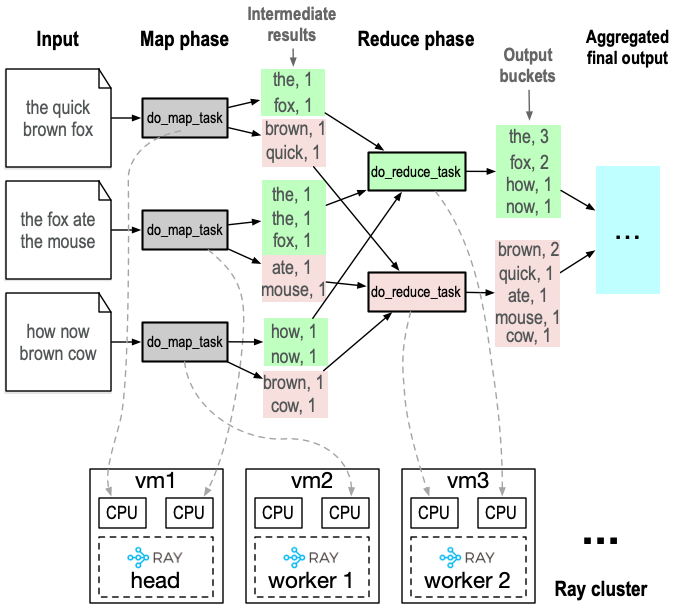
A high-level visualization of WordCount is shown in the figure below. In this example, three map tasks are launched on two Ray processes, two on the head node and one on worker 1. Two reduce tasks are launched on worker 2. Each map and reduce task is assigned one CPU core. Note in your MapReduce implementation, however, since the reduce phase will not start untill all map tasks are complete, the reduce tasks will likely get assigned to the same set of CPU cores that ran the map tasks seconds ago. The intermediate results span a list of 3 x 2 = 6 buckets, this is because this WordCount has 3 map tasks and 2 reduce tasks. The final outputs span 2 buckets, each produced by a reduce task. These partial outputs will eventually be merged together by the provided client code.
You will complete four tasks for this part:
Task 1: Your first task of this assignment is to implement the logic of WordCount’s map task, do_map_task. do_map_task is defined as a @ray.remote() task, and therefore, the client driver needs to send it the input data as function arguments. do_map_task will perform the following two tasks:
- Call
map_function()(see Task 2) on the input bucket to emit a list of key-value (KV) pairs, where each KV pair is a(word, 1)tuple. - Calculate which reduce task a
(word, 1)KV pair should go to and append the KV pair to the corresponding intermediate results bucket. Each map task will generate N intermediate results buckets. Each intermediate results bucket will be later processed by an associated reduce task.
Task 2: Your second task is to implement map_function, which simply converts a map_input into a list of KV pairs, where the key is the word and the value is set to 1.
IMPORTANT: The ‘word’ in each KV pair emitted should be in lowercase so that the same words, regardless of their original case, can be reduced (combined) in the reduce phase.
Task 3: Your third task is to implement the reduce method, do_reduce_task. do_reduce_task is also defined as a @ray.remote() task. Therefore, each reduce task will take as input M intermediate result buckets, each produced by a map task and consumed by this reduce task. do_reduce_task will perform the following tasks:
- Iterate over each input bucket and populate a dict-based table with the key as each unique word and the value as a list of all
1s associated with that key. - Iterate each item in the table and sum all
1s under each key by callingreduce_function()(Task 4). Return an output table with the word as the key and its count as the value.
Task 4: Your fourth task is to implement reduce_function, which simply returns the number of items (1s) in the input argument val.
To test your code, run the driver code to launch the entire MapReduce WordCount pipeline on your Ray cluster. How the driver code works:
The driver code is divided into two parts: a first part that invokes all map tasks in parallel, and a second part that invokes all reduce tasks in parallel. Each map task will take an map_input and generate a list of return values, where each return value is an intermediate results bucket (intermediate_results) that will be consumed by a reduce task (num_returns = num_reduce_tasks).
The reduce phase will start right after the map phase concludes. Each reduce task will take as input a list of M map_output from intermediate_results. Once all N reduce tasks are done, a list of N merged_partial_results buckets is produced.
Run the next cell to collect and aggregate all reduce tasks’ outputs at the client. This cell will print the top 20 words with the highest counts. To test the correctness of your implementation, run the test_mr.sh test script from the wc test cell:
!bash ./test_mr.sh
Part 3: RL training on Ray
Software installation
For this part, you will need several new software dependencies in order to support the RL training and game environments.
$ sudo apt install -y swig
$ pip3 install gym==0.21.0 cffi mujoco-py==0.5.7 'gym[box2d]' torch numpy
To enable game play visualization, you need the following dependencies (see Visualizing game playing):
$ sudo apt install -y xvfb freeglut3-dev python3-opengl
$ pip3 install pyopengl pyglet==1.5.11 pyvirtualdisplay matplotlib
DQN and game environment
In this part, you will exercise Ray actor programming. Specifically, you will implement a distributed actor framework that parallelizes the training of a reinforcemnet learning (RL) model on a Ray cluster. The RL model that you train in this part will excel in playing the game of Lunar Lander. The algorithm to train the RL model is DQN (Deep Q-Network). Here are some resources to help you become acquainted with DQN:
- The Deep Q-Network (DQN)
- Playing Atari with Deep Reinforcement Learning
- Reinforcement Learning (DQN) Tutorial
Your job
We have procided two Notebook files to help you get started. Download the file from this link using wget. The zip file includes two Notebook files:
a
single_node_dqn.ipynbfile, which contains a standalone implementation of a single-node DQN training program; it provides hints on how one could implement a distributed version of DQN training (see Hint 2 below);a
ray_cluster_dqn_skeleton.ipynbfile, which marks TODO tasks for you to complete.
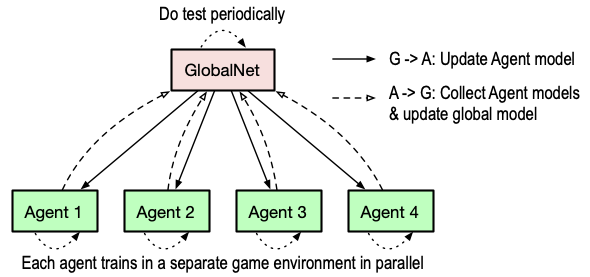
Your job is to implement a distributed actor framework, which collectively trains a DQN model to excel in the Lunar Lander game. This distributed actor framework consists of N Agent actors distributed across the cluster, each responsible for training a local model in a different game environment and synchronizing with a global parameter server – a GlobalNet actor (i.e., the global parameter server) – running on vm1. GlobalNet does two things: (1) updating the global model by aggregating model parameters trained at each Agent actor, and (2) periodically testing the global model trained to determine if the model is well trained. See the figure below for an illustration about the architecture of the RL actor framework. Since you have five EC2 instances, by default you need one EC2 instance to host the GlobalNet actor and four instances to host the four Agent actors. This framework setup is configurable; see Task 6 below.
In this part, you are not asked to write specific logic for the two kinds of actors. The actors are already implemented. You are expected to implement control logic around the training for loop of the driver code. The control logic is supposed to control and coordinate each actor to perform its own job in a training episode. Specifically, this part features seven tasks as follows:
Task 0: In this task, you will add the Ray actor decorator to the right places to indicate which code will be actors.
- Task 1: In this task, you will write control logic to:
- Initialize a
GlobalNetactor and a cluster of NAgentactors, where N is determined bynum_agentsthat you configured. - Distribute the initialized model weights to all N
Agentactors.
- Initialize a
Task 2: In this task, you will write control logic that trains the
Agentactors in parallel.Task 3: In this task, you will write control logic that tells the
GlobalNetactor to collect local weights from eachAgentactor and perform an average operation on the collected weights.Task 4: In this task, you will write control logic that tells each
Agentactor to perform a model weight synchronization operation by fetching the globally averaged model weights from theGlobalNetactor.- Task 5: In this task, you will write control logic to:
- have the
GlobalNetactor play a series of test game and print the average reward score fetched fromGlobalNet, the same way it does in single-node training. - set the termination condition; the training will terminate if either one of the following two conditions is met:
- If the average game reward is equal to or greater than 100,
- OR, if the number of training episodes has reached 1000 (unlikely to hit this condition though).
- save the trained model once the average score reaches 100, by calling
torch.save(global_weights, './model_checkpoint.pth').
- have the
Hint 1: The deliverable of this part should target a
average_game_rewardof 100 However, for debugging purpose, you may use a smaller target score, say 20 or 30 so that you don’t need to wait for too long during that process. To give you some idea about how long a distributed training may take: the training time on a five-node cluster cound range from 500 seconds to 1000 seconds when the target score is set to 100; it might take around 200-300 seconds to train if the target score is set to 30. The training time varies (sometimes significantly) across runs. Can you explain why the variance is so high for RL training?
- Task 6: Tune three key hyper-parameters (
num_agents,batch_size, andnum_epochs_agents_train) to understand how they would affect the key training metrics such as training time and training quality. For example, you could tune the number ofAgentactorsnum_agentsand the amount of CPU resources assigned to theAgentactors and theGlobalNetactor. By default the CPU resource is set tonum_cpu=2. That’s the maximum CPUs that you could allocate to an actor, as each EC2 instance is equipped with 2 CPUs only. However, you could reduce it to, say,num_cpu=1so that you can have more actors train a model in parallel. Withnum_cpu=1forAgentandGlobalNetactors, you could run at most 9Agentactors and 1GlobalNetactor in your five-node cluster. Try it and see how it would affect your end-to-end training time: here, training time reflects the training quality: the longer it takes to reach a reward score of 100, the worse the training quality. Similarly, tunebatch_sizeandnum_epochs_agents_trainand see their impact.batch_sizedenotes the number of states anAgentactor retrieves fromReplayBufferfor local training.num_epochs_actors_traindenotes the maximum number of episodes that anAgenttrains locally before sending the local model toGlobalNetand updating its local model with the global model. Report your observations and reasoning in your report. You may want to draw a timeline of the average game reward scores for comparing differnet combinations of hyperparameters.
Hint 2: The implementation of
GlobalNetandAgentis well commented. The comments there provide some hints about how you should call the already implemented methods from these two classes in order to complete Task 1-5. You need to read the code carefully. Distributed training usingAgentactors andGlobalNetactor mirrors the process of single node training. Several differences betweensingle_node_dqn.ipynbandray_cluster_dqn.ipynb: (1) Distributed training offloads and parallelizes the training to a cluster and relies on a centralized parameter server for global model synchronization. (2) EachAgentin a distributed training setting trainsnum_epochs_actor_trainepisodes before synchronizing withGlobalNet, while theLearnerdirectly trains a local model in the single-node version. You should also read the code insingle_node_dqn.ipynb, which hints on how one could potentially organize control logic code to implement actor-based distributed training.
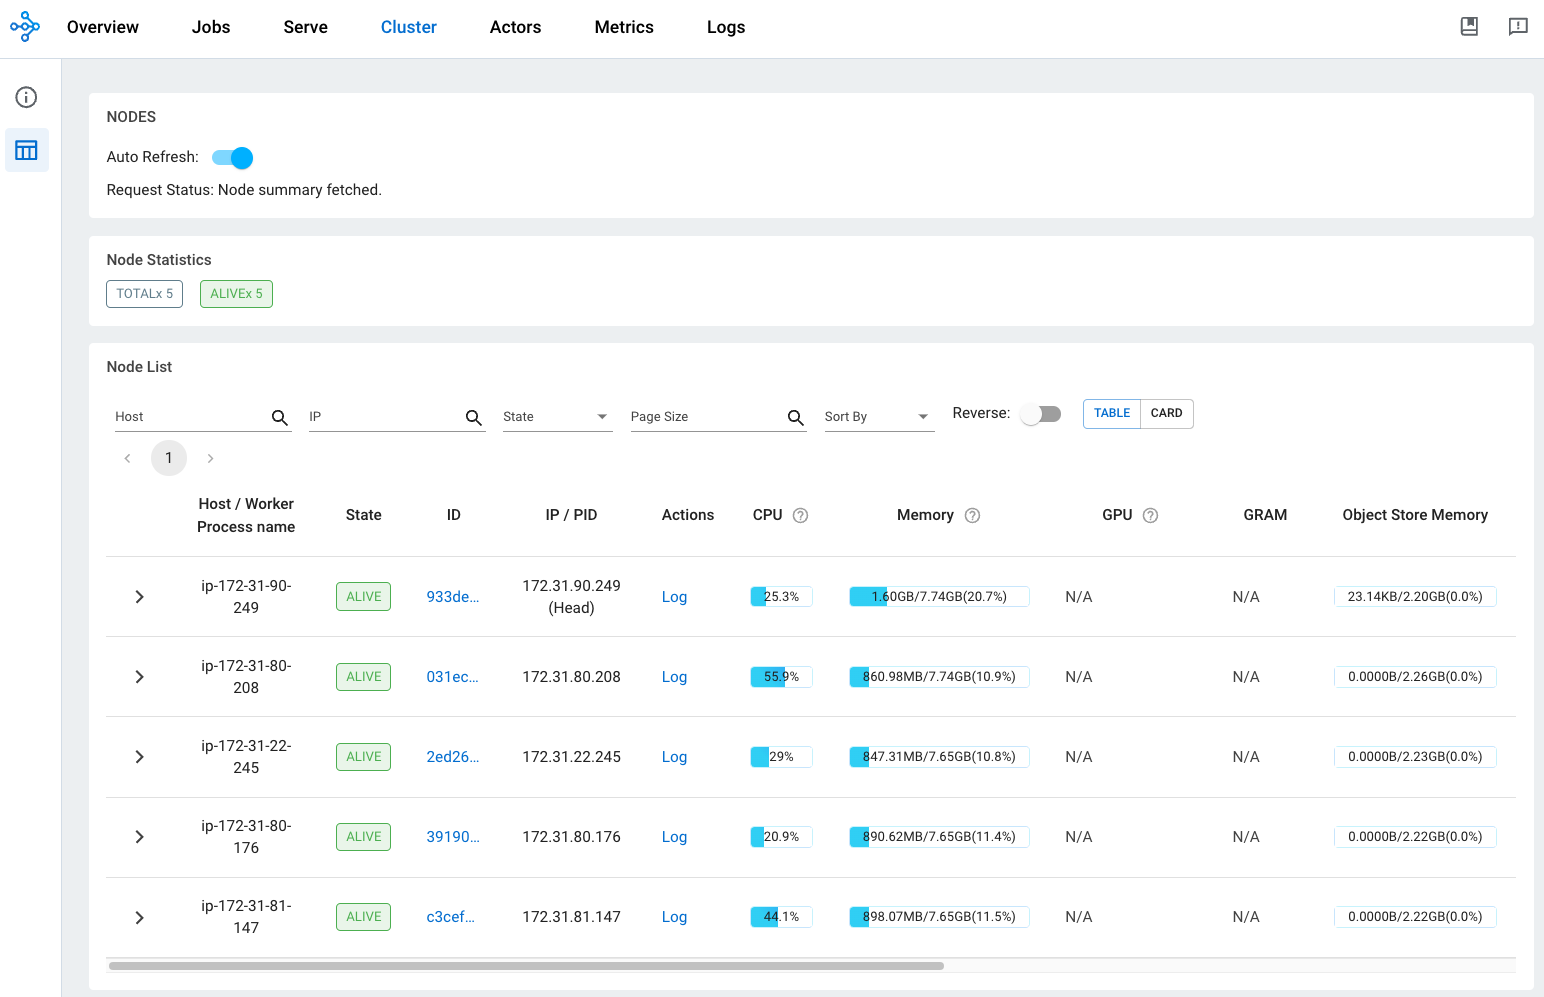
Hint 3: RL training is a long-running process. You should always use the dashboard to monitor the execution progress of your training job. On the dashboard UI, click on the
Clustertab to view the real-time CPU and memory resource usage (see an example snapshot below). You can also view the executions of actors by clicking on theJobstab or theActorstab.
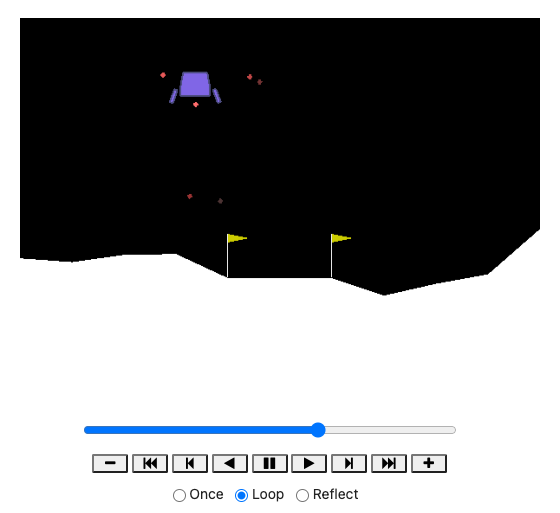
Visualizing game playing
The last piece of Notebook cells in the Ray cluster DQN training Notebook is for visualizing the game play. The code will load the saved model checkpoint that you trained and generate video clips to visualize the game playing process. See a snapshot below.
Deliverables
You should submit a tar.gz file to Canvas, which follows the naming convention of LastName_FirstName_ComputingID_A3.tar.gz. The submitted file should include:
- an
.ipynbfile containing the code of all tasks for Part 2: Ray MapReduce (filename:LastName_FirstName_ComputingID_A3_Part2.ipynb), - an
.ipynbfile containing the code of all tasks for Part 3: Ray RL (filename:LastName_FirstName_ComputingID_A3_Part3.ipynb), - and a short
PDFreport (filename:LastName_FirstName_ComputingID_A3_report.pdf).
The skeleton we supplied is well documented with clearly marked TODOs to tell you where you should add your own code. Your code should be well commented as well. The code comment should include Part number and Task number and include a brief description of the implementation. Comments are worth some percentage of your grade for the assignment, the GTAs will be looking at your code as well as the comments (comments serve as a README for a particular task).
For the PDF report, in addition to the observations and reasoning for Task 6, you should also report anything that you learned from this assignment, from measurement statistics and insights that you learned, new skills and new hands-on experience you picked up, or something that you would have liked to try but did not get a chance to, just to list a few.