Assignment 2 Due Friday Mar 17, 11:00am ET
FAQ
- Watch the video demo for A2 setup here.
Overview
This assignment is designed to support your in-class understanding of how distributed and parallel Python analytics tools work and get some hands-on experience in using them. You will deploy Dask.distributed as the computing framework. You will then write Python Dask code to do some basic descriptive statistics tasks on a medium-sized real-world dataset. You will also produce a short report detailing your observations and takeaways.
Learning outcomes
After completing this assignment, you should be able to:
- Configure and deploy
Dask.distributedon a Linux cluster. - Write basic Python applications to analyze large CSV files using
Dask.distributed. - Understand the scalability of distributed data processing frameworks.
- Describe how
Dask.distributedworks with datasets that are shared among multiple worker nodes.
Part 0: Environment setup
Like the previous assignment you will complete this assignment on AWS. See Assignment 0 to learn how to use AWS Academy to access AWS cloud resources.
In this assignment, you should create 5 EC2 VM instances of type t3.large to host a 5-node Dask cluster. We recommend creating 5 EC2 instances in one go by following the instructions from Assignment 0 (Step 1).
First, you should enable password-free SSH service between all the five EC2 instances. To do so, generate a private/public key pair using:
$ ssh-keygen -t rsa
on the scheduler EC2 instance node (which we call vm1). The other EC2 instances will be assigned as workers. Then, manually copy the public key of vm1 to the authorized_key file in all the 5 instances (including vm1 and and the other 4 instances) under ~/.ssh/. To get the content of the public key saved in id_rsa.pub, do:
$ cat ~/.ssh/id_rsa.pub
Then copy the entire output of the above command to authorized_key. Make sure you do not append any newlines. Otherwise it will not work. Also note that you should NOT overwrite the existing line in authorized_key file. Otherwise you will no longer be able to login to your VM.
Once you are done with vm1, you should copy the content of id_rsa.pub in vm1 over to ~/.ssh/authorized_key in vm2, vm3, vm4, and vm5. This way, the leader node vm1 will have password-free SSH access to both itself and its follower nodes vm2-vm5.
Part 1: Software deployment
Dask.distributed
Dask is a Python library and framework for Python-based parallel computing. It comes with two sets of parallel programming libraries: one for single-machine-based, shared memory parallel computing, and the other for distributed computing that spans multiple machines. In this assignment, we will focus on the second type of Dask parallel tools based on Dask.distributed library.
Dask.distributed is a lightweight library for parallelizing Python computing to a cluster of machines. You can find a rather poor deployment tutorial in this official dask website (link), or you can just follow our more detailed version here.
Before starting Step 1, you should have already created a 5-instance EC2 cluster (see Part 0).
Step 1: Install Dask
First, install pip3 (the package installer for Python).
$ sudo apt update
$ sudo apt install -y python3-pip
$ which pip3
After the installation, pip3 should appear at the following path /usr/bin/pip3.
Next, install the full Dask package:
$ pip3 install dask[complete]
The third command above, which pip3, should output something like /usr/bin/pip3 if it’s successfully installed.
pip3 by default will install everything in /home/ubuntu/.local/bin on your EC2 instance. This path, however, is not included by the environment variable $PATH, so your shell will not be able to locate the installed programs through pip3. To fix this, you will need to include the path in $PATH by running the following command:
$ source ~/.profile
Then, try which dask and it should locate the dask executable under /home/ubuntu/.local/bin/dask.
IMPORTANT: You should install Dask on all the 5 EC2 instances of your cluster.
Step 2: Install Jupyter Notebook
NOTE: If you installed Notebook for Assignment 1, it’s the same process.
You will be using Jupyter Notebook for development and testing. To install Jupyter Notebook:
$ pip3 install notebook
You don’t need to install Jupyter Notebook on all the EC2 instances. Installing Jupyter Notebook on one instance should be sufficient. We recommend installing Notebook on vm1.
Step 3: Deploy a Jupyter Notebook server
SSH into one of your EC2 instances (say the scheduler instance vm1) using the following command:
$ ssh -i "vockey.pem" ubuntu@<public_IPv4_DNS_address_of_your_EC2_instance> -L 8000:localhost:8888
The -L option is to forward any connections to the given TCP port 8000 on your local client host to the given remote host (the specified EC2 instance of <public_IPv4_DNS_address_of_your_EC2_instance>) and port (8888), or Unix socket, on the remote side.
Once SSH’ed in, start the Jupyter Notebook server process using command jupyter notebook. You will see some output information generated by the launched Notebook server process:
To access the notebook, open this file in a browser:
    file:///home/ubuntu/.local/share/jupyter/runtime/nbserver-3233-open.html
Or copy and paste one of these URLs:
    http://localhost:8888/?token=557f06135dd4c77bc5267c88abca55db1672f741ff7631a4
 or http://127.0.0.1:8888/?token=557f06135dd4c77bc5267c88abca55db1672f741ff7631a4
On your local client machine, open a web browser and go to localhost:8000 and copy paste the token. Now you can start writing Python code using your Notebook GUI from your browser.
Step 4: Deploy a Dask cluster
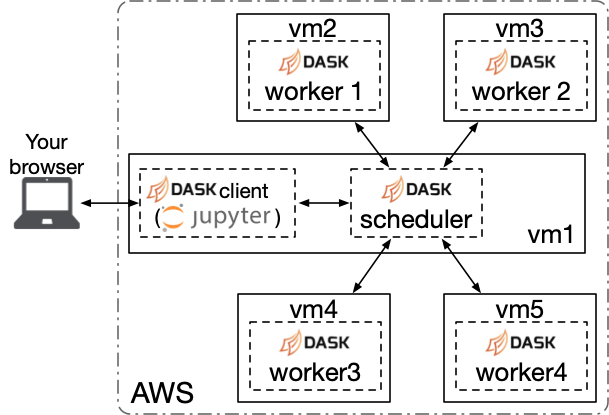
In this assignment you will program a Dask application on a 5-node EC2 cluster. The architecture of your cluster is shown in the figure below.
SSH into the EC2 instance that you plan to host the Dask scheduler (i.e., the scheduler EC2 instance vm1) using the following command:
$ ssh -i "vockey.pem" ubuntu@<public_IPv4_DNS_address_of_your_EC2_instance> -L 8001:localhost:8787
Note again you are forwarding a local port (which in this case is 8001) to the remote port 8787 on your EC2 instance. Once SSH’ed in, start the Dask scheduler process using the following command:
$ dask scheduler --host 0.0.0.0
Forwarding the connection to the local port 8001 to remote 8787 on your EC2 instance is to access the Dask dashboard from your local browser. Type localhost:8001 to access the Dask dashboard.
Next, SSH into the other 4 EC2 instances that will be your Dask worker nodes. Start a Dask worker process on each of these 4 instances with the following command:
$ dask worker <private_IPv4_address_of_scheduler_instance>:8786 --nworkers 2 --nthreads 4
The first specified option in the above command <private_IPv4_address_of_scheduler_instance>:8786 is to let this Dask worker know that it should connect to the Dask scheduler running at that specified IP address and port; the second option --nworkers 2 is to configure this Dask worker to launch two separate Python processes on that EC2 instance; the third option --nthreads 4 is to configure this Dask worker to launch four Python threads in each of the two Dask worker processes.
WHY TWO PROCESSES PER WORKER? The reason is simple: each of your EC2 worker nodes is equipped with an EC2 instance type of
t3.large, which has only 2 vCPU cores and 8 GB of memory. Running more than two Python processes would not help. But for concurrent processing each one of the two Dask worker processes has 4 Python threads within an individual worker process.
Configuring more than one thread per worker process could be helpful in some cases where concurrent processing is needed. But you should note that Python has limited parallel processing capability due to the restriction of so-called GIL (global interpreter lock). The Python GIL is a mutex that protects access to Python objects, preventing multiple threads from executing Python bytecode at once. While it simplifies the implementation of the inner mechanisms to some extent, it prevents multithreading Python programs from taking full advantage of modern multi-core systems in certain situations (for example, in our case, the data-intensive application scenarios). Therefore, having more than one Dask worker process is helpful as this deployment improves the parallelism.
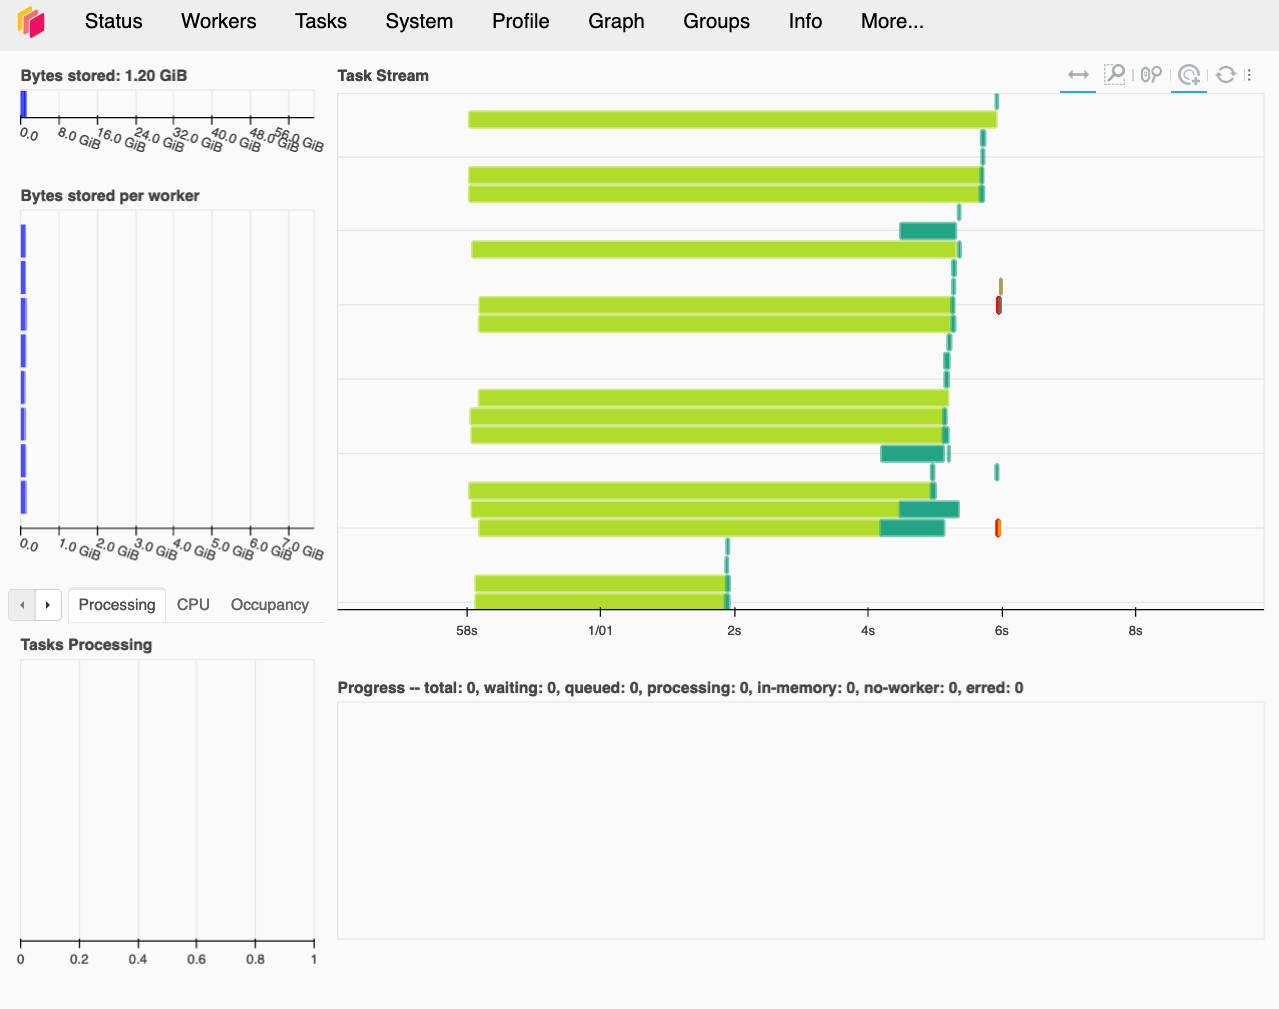
To verify that you have 4 workers launched, check the log information from the terminal where you run the Dask scheduler. Or go to the Dask dashboard, you should be able to see all the connected workers. See a snapshot below. Yours, however, should be a brand new dashboard with eight vertical blue bars under Bytes stored per worker and no colorful task stream visualizations under Task Stream.
Part 2: Programming tasks
Dataset
In this part, you will implement a simple Dask program. We have provided a dataset that you can download from the link below. Make sure the dataset is available under the same path on EC2 instances where the scheduler and workers are running. To do so, use wget to download the dataset to the scheduler node vm1:
$ cd ~
$ wget --load-cookies /tmp/cookies.txt "https://docs.google.com/uc?export=download&confirm=$(wget --quiet --save-cookies /tmp/cookies.txt --keep-session-cookies --no-check-certificate 'https://docs.google.com/uc?export=download&id=1mi7BBYACuc7KYhbURV1BIhj5OwcP8eFd' -O- | sed -rn 's/.*confirm=([0-9A-Za-z_]+).*/\1\n/p')&id=1mi7BBYACuc7KYhbURV1BIhj5OwcP8eFd" -O stackoverflow.zip && rm -rf /tmp/cookies.txt
$ unzip stackoverflow.zip
Then scp the two .csv files to all the other 4 EC2 instances.
$ scp question*.csv <private_IPv4_address_of_worker>:~/
Notebook skeleton
We have also provided a Jupyter Notebook skeleton to help you get started. To download the .ipynb file, run:
$ wget https://tddg.github.io/ds5110-spring23/assets/a2.ipynb
Dataset description
The dataset has two files, a questions.csv file and a question_tags.csv file.
The schemas of questions.csv are as follows:
| Column name | Description |
|---|---|
Id | ID of the question |
CreationDate | Creation date of the question |
ClosedDate | The date when the question was closed |
DeletionDate | The date when the question was deleted |
Score | Score of the question |
OwnerUserId | ID of the question’s owner user |
AnswerCount | Number of answers under this question |
The schemas of question_tags.csv are as follows:
| Column name | Description |
|---|---|
Id | ID of the question |
Tag | Tag of the question |
- Task 1. Get the percentage of missing values for all the columns in the questions table and the question_tags table.
- Task 2. Get mean, standard deviation, medium, min, and max of the Score column in the questions table.
- Task 3. Get the top 5 tags that have the highest number of questions (hint: manipulate the question_tags table).
- Task 4. Check if there are any dangling references to the question
Idfield from the questions table to question_tags table. Return 1 if there are dangling references; return 0 otherwise. - Task 5. Create a new owner user table based on the questions table grouped by the
OwnerUserIdfield. Refer to this link for Dask’sgroupbyoperator. Refer to this link to see how to use Dask’sgroupby.aggoperator to apply multiple functions to different columns of the re-grouped dataframe. The new table should have the following fields: (1)OwnerUserId: the field that the table is grouped by; (2)AverageScore: aggregated by getting the average score value of the owner user; (3)NumQuestions: aggregated by getting count value of theIdfield of corresponding owner users; (4)NumAnswers: aggregated by getting the sum value of theAnswerCountfield of corresponding owner users. See the schema table with the corresponding aggregation functions as follows:
| Column name | Description | Aggregation function |
|---|---|---|
OwnerUserId | ID of the question’s owner user | – |
AverageScore | Average (mean) score across all questions posted by this user | mean |
NumQuestions | Number of questions (count) posted by this user | count |
NumAnswers | Number of answers (sum) received by all the questions posted by this user | sum |
In Task 5, you should output the top 5 owner users who asked the most number of questions.
- Task 6. Create a new table by merging the questions table and the question_tags table using
Idas the index. Then group the new table byTagwith the following aggregated fields: (1)Tag: the field that the table is grouped by; (2)AverageScore: aggregated by getting the average score value of the corresponding tags; (3)NumAnswers: aggregated by getting the sum value of theAnswerCountfield of corresponding tags; (4)NumQuestions: aggregated by getting the count value of theIdfield of corresponding tags; and (5)NumOwners: aggregated by getting the count value of theOwnerUserIdfield of corresponding tags. The schemas are listed as follows:
| Column name | Description | Aggregation function |
|---|---|---|
Tag | ID of the question | – |
AverageScore | Average (mean) score across all questions marked with this tag | mean |
NumAnswers | Number of answers (sum) received by all questions marked with this tag | sum |
NumQuestions | Number of questions (count) marked with this tag | count |
NumOwners | Number of users (count) asking questions marked with this tag | count |
This task should output the top 5 tags with the highest number of questions and the top 5 tags with the highest number of answers received.
Deliverables
You should submit a .ipynb file to Canvas, which follows the naming convention of LastName_FirstName_ComputingID_A2.ipynb.
Code should be commented well (which will be worth some percentage of your grade for the assignment, the GTA will be looking at your code). Use the comment as a README for each task and report your own findings if any.