Tutorial about Setting Up an AWS-EC2-hosted Jupyter Notebook Service
There are two ways of writing/editing PySpark programs on a remote cloud server:
- Use a shell text editor of your choice (e.g., VIM, nano, Emacs, etc.).
- Launch a Jupyter Notebook and directly write PySpark code there.
This tutorial is provided in case you need to use Jupyter Notebook for Assignment 1, though you can complete the assignment without it.
Step 0: Install Pip
First, install pip3 (the package installer for Python).
$ sudo apt update
$ sudo apt install -y python3-pip
$ which pip3
The third command above, which pip3, should output something like /usr/bin/pip3 if it’s successfully installed.
pip3 by default will install everything in /home/ubuntu/.local/bin on your EC2 instance. This path, however, is not included by the environment variable $PATH, so your shell will not be able to locate the installed programs through pip3. To fix this, you will need to include the path in $PATH by running the following command:
$ source ~/.profile
Step 1: Install Jupyter Notebook
To install Jupyter Notebook:
$ pip3 install notebook
Step 2: Install findspark library
$ pip3 install findspark
This is used to help your Jupyter Notebook find the Spark directory.
Step 3: Configure JAVA_HOME
Add export JAVA_HOME=/usr/lib/jvm/java-8-openjdk-amd64/jre to your /home/ubuntu/.bashrc file:
$ echo 'export JAVA_HOME=/usr/lib/jvm/java-8-openjdk-amd64/jre' >> ~/.bashrc
$ source ~/.bashrc
This is so that your PySpark code running inside of a Jupyter Notebook session can find the corresponding Spark Java/Scala runtime.
Step 4: Deploy a Jupyter Notebook server
SSH into your EC2 instance where you’ve just installed the Jupyter Notebook (say the scheduler instance vm1) using the following command:
$ ssh -i "vockey.pem" ubuntu@<public_IPv4_DNS_address_of_your_EC2_instance> -L 8000:localhost:8888
The -L option is to forward any connections to the given TCP port 8000 on your local client host to the given remote host (the specified EC2 instance of <public_IPv4_DNS_address_of_your_EC2_instance>) and port (8888), or Unix socket, on the remote side.
Once SSH’ed in, start the Jupyter Notebook server process using command jupyter notebook. You will see some output information generated by the launched Notebook server process:
To access the notebook, open this file in a browser:
    file:///home/ubuntu/.local/share/jupyter/runtime/nbserver-3233-open.html
Or copy and paste one of these URLs:
    http://localhost:8888/?token=557f06135dd4c77bc5267c88abca55db1672f741ff7631a4
 or http://127.0.0.1:8888/?token=557f06135dd4c77bc5267c88abca55db1672f741ff7631a4
On your local client machine, open a web browser and go to localhost:8000 and copy paste the token when it prompts. Now you can start writing Python code using your Notebook GUI from your browser.
Step 5: Work on PySpark programming using your cloud-hosted Notebook
Before importing pyspark in your Notebook session, you should first import findspark and use it to locate to the Spark directory:
import findspark
findspark.init('/home/ubuntu/spark-3.3.1-bin-hadoop3')
Then you can import the PySpark package and start working on the assignment using Jupyter Notebook.
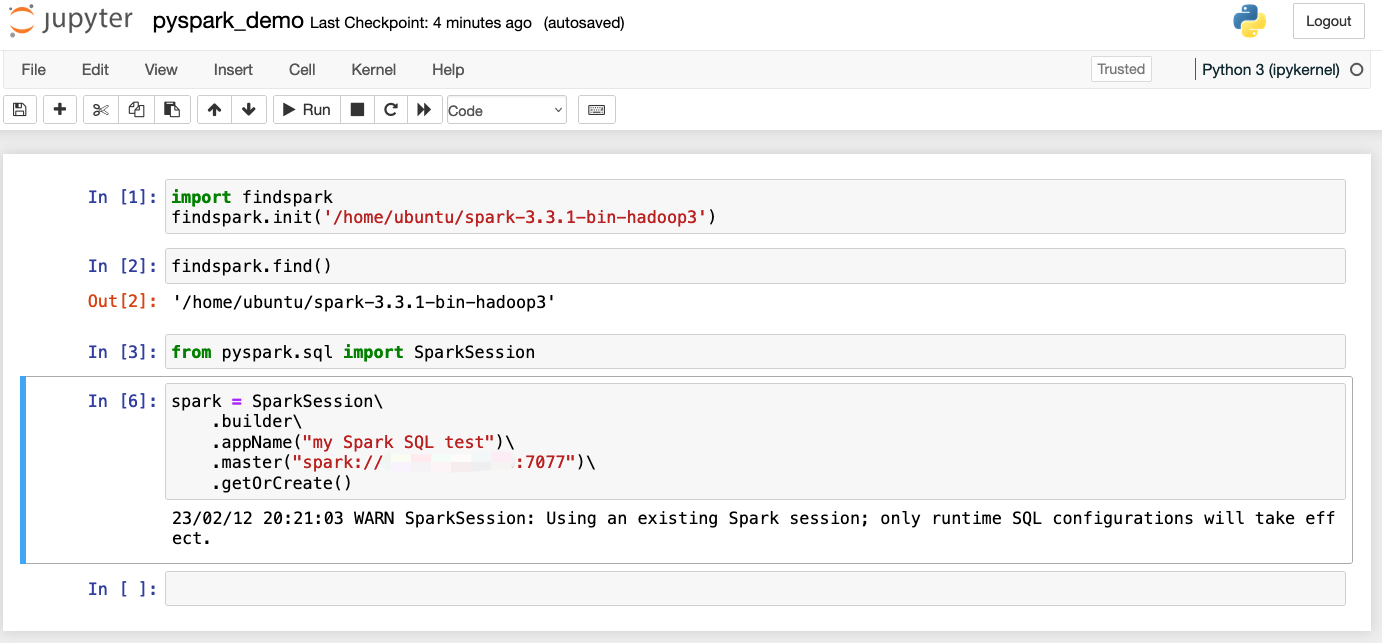
In the snapshot above, the blurred Spark URL under .master() should be the private IP address of your Spark Master node.
NOTE: You should call
spark.stop()at the end of your implementation to stop the driver. Otherwise theSpark-Submitprogram will keep hanging there waiting to be stopped, and that will block all your subsequent queries made to the Spark workers.
Hope this helps!